ComfyUI Beginner's Ultra-Detailed Guide
Autor: Jacky Fan • Publicado el 11 de marzo de 2025 •14 min lectura

Discover the ultimate step-by-step ComfyUI tutorial! This 10,000-word guide breaks down everything you need to know in the simplest way possible. Perfect for absolute beginners – even your grandma can learn ComfyUI with ease. Start your journey today!
A New Star in the AI Painting World: ComfyUI
Since the second half of 2023, a new star has emerged in the AI painting world — ComfyUI. This tool has rapidly gained popularity among creators due to its fast, smooth image generation capabilities and its compatibility with low-spec devices. One of ComfyUI's highlights is its ability to load a large number of workflows with a single click, allowing users to easily perform functions such as portrait generation, background replacement, and image animation.
If, like many others, you began your Stable Diffusion journey with a Web UI, you might be curious about the rise of ComfyUI. Its popularity is soaring, and it has already become the top choice for many AI painting enthusiasts. In this article, I will introduce you to ComfyUI, an application that is changing the game in AI painting.
ComfyUI is a modular and node-based user interface for Stable Diffusion models. It allows users to visually create and manage complex image generation workflows by linking various functional nodes. Developed by @comfyanonymous, it aims to be flexible, extensible, and accessible to both beginners and advanced users.

Introduction to ComfyUI
What is ComfyUI?
ComfyUI is a node-based graphical user interface (GUI) specifically designed for Stable Diffusion. It allows users to build complex image generation workflows by linking different blocks, called nodes. These nodes can perform various tasks such as loading checkpoint models, inputting prompts, selecting samplers, and more.
Essentially, ComfyUI serves as a professional interface for running Stable Diffusion, but in a node-based format. This type of interface is commonly used in various professional productivity tools, such as Blender, Unreal Engine, and DaVinci Resolve.
Official Introduction:
1. Comparison Between WebUI and ComfyUI
ComfyUI: Flexibility and Customization
ComfyUI offers a high degree of freedom and flexibility, supporting extensive customization and workflow reuse. It also has lower system requirements and can generate images faster than traditional methods. However, due to its numerous plugin nodes and more complex operations, it has a steeper learning curve.
WebUI: Ease of Use and Stability
On the other hand, WebUI features a fixed user interface, making it easier to learn and quick to get started. Over the past year, it has developed into a mature and stable open-source ecosystem. However, compared to ComfyUI, WebUI may be slightly less efficient in terms of performance and has limitations in workflow replication, requiring users to manually configure settings for each operation.
Which One Should You Choose?
For beginners, starting with WebUI is recommended to get familiar with AI image generation. Once comfortable, transitioning to ComfyUI can help users fully leverage AI workflows and maximize efficiency.
| Feature | Comfy UI | Web UI |
|---|---|---|
| Interface Operation | Node-based operation interface | Fully visualized interface |
| Installation Requirements | Windows + [M series chip] Mac, AMD GPUs only work on Linux, Minimum requirement: 3GB VRAM | Windows + Mac, AMD GPUs have an integrated package, Minimum requirement: 4GB VRAM |
| Performance Comparison | Uses less VRAM, faster when generating large images | Uses more VRAM than ComfyUI, relatively slower generation speed |
| Difficulty of Use | ⭐⭐⭐⭐⭐⭐⭐⭐⭐⭐ | ⭐⭐⭐⭐⭐ |
| Feature Comparison | Both are based on Stable Diffusion, basic functions are similar, some plugins are exclusive to specific interfaces | |
| Usage Recommendation | f you are already familiar with WebUI and want to advance your AI workflow, I highly recommend learning ComfyUI | Suitable for beginners trying AI-generated images, those using AI to reduce costs and increase efficiency in work, and those looking to make commercial profits while learning AI |
2. Target Users & Use Cases
Who should use ComfyUI, and in what scenarios? Below are 10 key user groups and use cases:
1. Image Generation & Editing
- Users: Digital artists, designers, photographers
- Use Case: Creating complex images, enhancing photos, and performing deep image editing.
2. AI Research & Experimentation
- Users: AI researchers, ML engineers, developers
- Use Case: Building and testing image generation models and custom AI workflows.
3. Personalized Content Creation
- Users: Video creators, bloggers, social media influencers
- Use Case: Quickly generating custom visuals for videos, blogs, and social media.
4. Education & Training
- Users: Educators, students, AI instructors
- Use Case: Teaching fundamental image processing and AI-generated art concepts.
5. Game Development & Animation
- Users: Game developers, animators, concept artists
- Use Case: Generating game assets, backgrounds, and character designs.
6. Product Design & Simulation
- Users: Product designers, UX/UI designers
- Use Case: Rapidly creating design prototypes, 3D renders, and mockups.
7. Marketing & Branding
- Users: Marketing teams, advertisers, branding agencies
- Use Case: Generating visual content for ads, logos, and promotional materials.
8. Storyboarding & Comic Art
- Users: Writers, graphic novel artists, storyboard creators
- Use Case: Creating illustrated storyboards and comic book visuals.
9. Medical & Scientific Visualization
- Users: Medical illustrators, researchers, scientists
- Use Case: Generating scientific diagrams, anatomy illustrations, and medical visuals.
10. Fashion & Textile Design
- Users: Fashion designers, textile artists, clothing brands
- Use Case: Creating unique fabric patterns, clothing mockups, and design prototypes.
With its high flexibility and node-based workflow, ComfyUI is becoming a powerful tool across multiple industries, enabling faster and more efficient creative processes. 
ComfyUI Installation Methods
Currently, there are there common installation methods:
- Using the official pre-packaged version
- Using Desktop App
- Manual Install
The methods are straightforward, with similar installation steps.
If you're concerned about potential errors with the official package, Desktop App is a great alternative, as it helps avoid some common issues.
2. Installing the Official Pre-Packaged Version
Step 1: Download the Official Package
You can get the official package from GitHub or a Baidu Netdisk link (contact me for the link).
🔗 Official ComfyUI Download: https://github.com/comfyanonymous/ComfyUI/releases
Step 2: Extract and Navigate the Files
After downloading, extract the package and open the folder. You will find the following key files and folders:
comfyui/→ Root directory where the program runsupdate/→ Folder for version updatesrun_cpu.bat→ Runs ComfyUI using CPUrun_nvidia_gpu.bat→ Runs ComfyUI using GPU
🚀 To launch ComfyUI, simply double-click run_nvidia_gpu.bat (for GPU) or run_cpu.bat (for CPU).
3.Installing via the ComfyUI App (Easiest Method)
The simplest way to install ComfyUI is by using its official app.
ComfyUI now provides a dedicated application for easy installation.
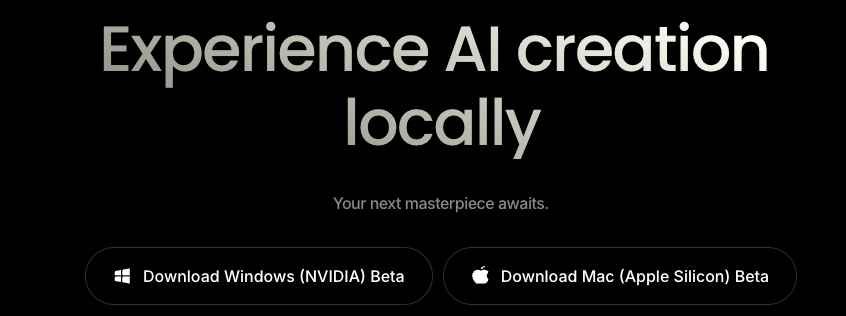
You can download it directly from the official website:
💻 Supported Platforms:
- Windows
- macOS
4. Launching ComfyUI
Once you have installed ComfyUI, you can start it and access the interface through your web browser.
Simply enter the following address in your browser:
Here is how the latest version of the ComfyUI interface looks:

3. How to Install Various Models
Note: The installation process is the same for both the official package and the one-click launcher.
1. Installing Independent Models
To install large models, LoRA, and other related models in ComfyUI (using the official package as an example):
- Navigate to the ComfyUI root directory.
- Locate the "Models" folder and double-click to open it.
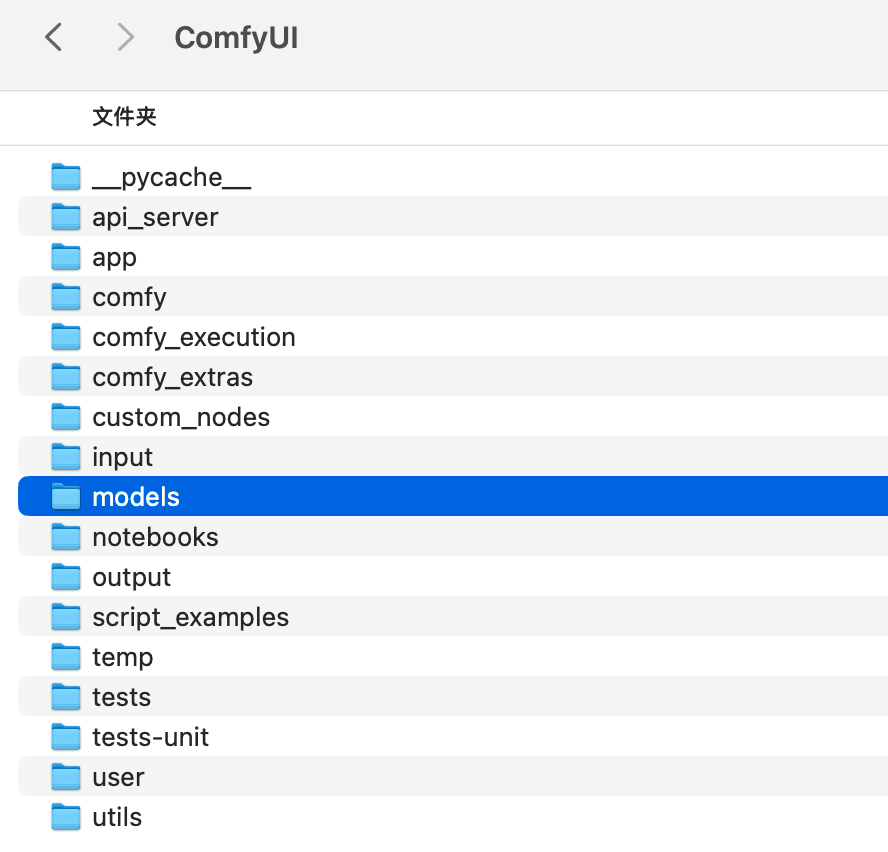
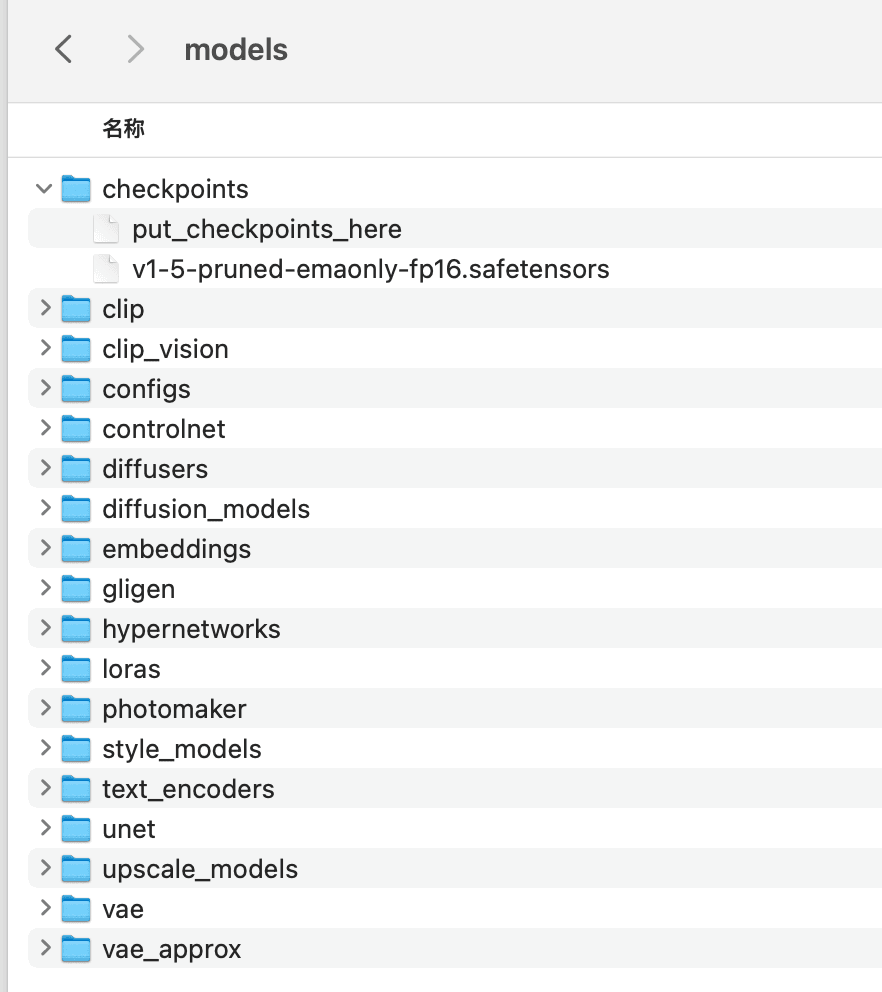
- Inside the "Models" folder, you will find subfolders named after different model types, such as:
- Checkpoints (for large models)
- Loras
- ControlNet
- Simply enter the corresponding folder and place the correct model files inside.
Building the Text-to-Image Workflow
Now, let's start building the ComfyUI workflow. I will guide you step by step to complete the text-to-image workflow.
Before we begin, we need to understand how to use shortcuts in the ComfyUI interface to help us operate more efficiently.
1. Shortcut Introduction
Here we refer to the shortcuts provided by the official documentation. Official address: https://github.com/comfyanonymous/ComfyUI?tab=readme-ov-file
Shortcut Reference
Here is a list of shortcuts and their functions for ComfyUI:
| Shortcut | Function | Shortcut | Function |
|---|---|---|---|
| Ctrl + Enter | Queue the current image for generation | Space | Move the canvas while holding Space and moving the cursor |
| Ctrl + Shift + Enter | Queue the current image as the first generation | Ctrl + Click | Add the clicked node to the selection |
| Ctrl + Z / Ctrl + Y | Undo / Redo | Ctrl + C / Ctrl + V | Copy and paste selected nodes |
| Ctrl + S | Save workflow | Ctrl + Shift + V | Copy and paste selected nodes, maintaining output connections |
| Ctrl + O | Load workflow | Shift + Drag | Move multiple selected nodes simultaneously |
| Ctrl + A | Select all nodes | Ctrl + D | Load default graph |
| Alt + C | Collapse/Expand selected nodes | Q | Toggle queue visibility |
| Ctrl + M | Mute/Unmute selected nodes | H | Toggle history visibility |
| Ctrl + B | Bypass selected nodes, similar to removing and reconnecting nodes | R | Refresh graph |
| Delete / Backspace | Delete selected nodes | Double-click LMB (Left Mouse Button) | Open node links to view |
The above shortcuts are the 20 shortcuts provided by the official documentation (for Windows). For macOS users, the Ctrl key can be replaced with the Cmd key. I will indicate which shortcuts are used in the actual operation in the following steps.
If you cannot see the Queue button, you can hold down Ctrl + - to zoom out the interface, and the Queue button will appear. You can then drag the button to the top bar.
2. Building the Text-to-Image Workflow
Next, I will guide you step by step through the process of building a text-to-image workflow in a hands-on manner. You don't need to take notes or memorize tedious functions when you're just starting out. I believe that only by actually going through the process can you grasp the functionalities and understand their purposes. This is my consistent teaching philosophy.
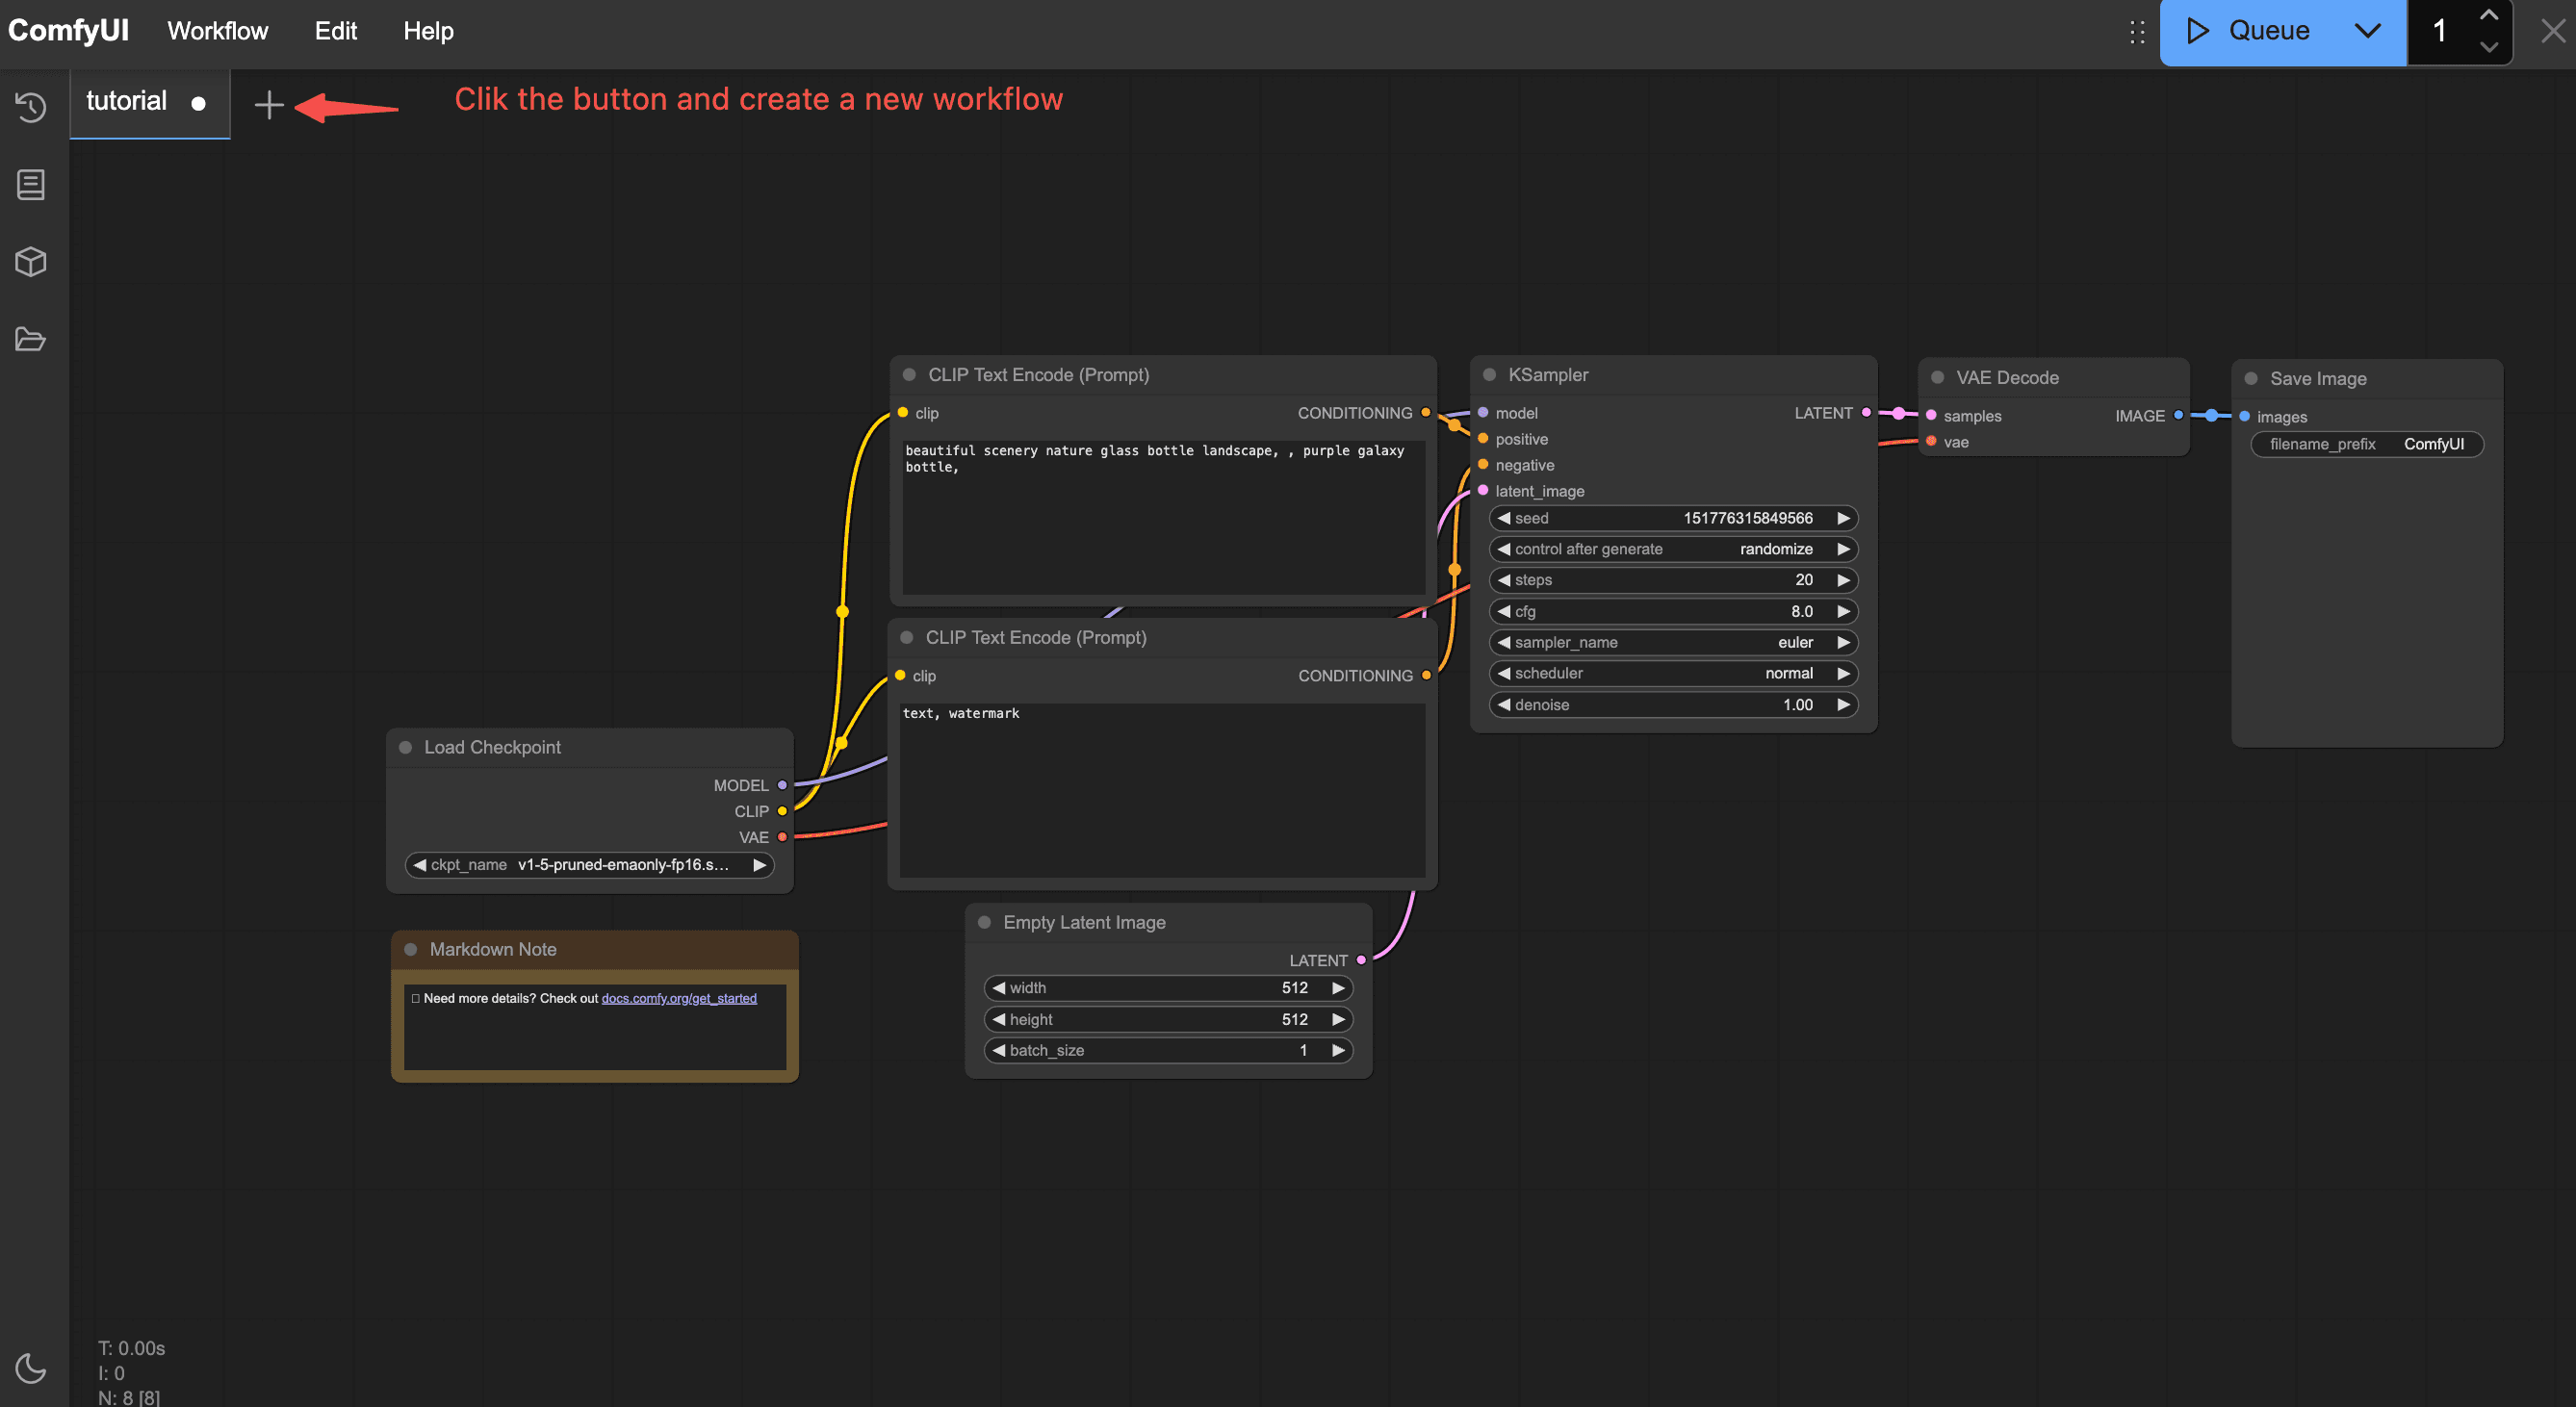
First, if you are launching the ComfyUI interface for the first time, your interface will have a default text-to-image workflow (of course, if you have used ComfyUI before, it will load the workflow you last closed by default).
Step 1: Add the "K Sampler"
In the blank area of the workspace, right-click to bring up the node function panel, select "Sampling" — "K Sampler". This will add a sampler node to our workspace.
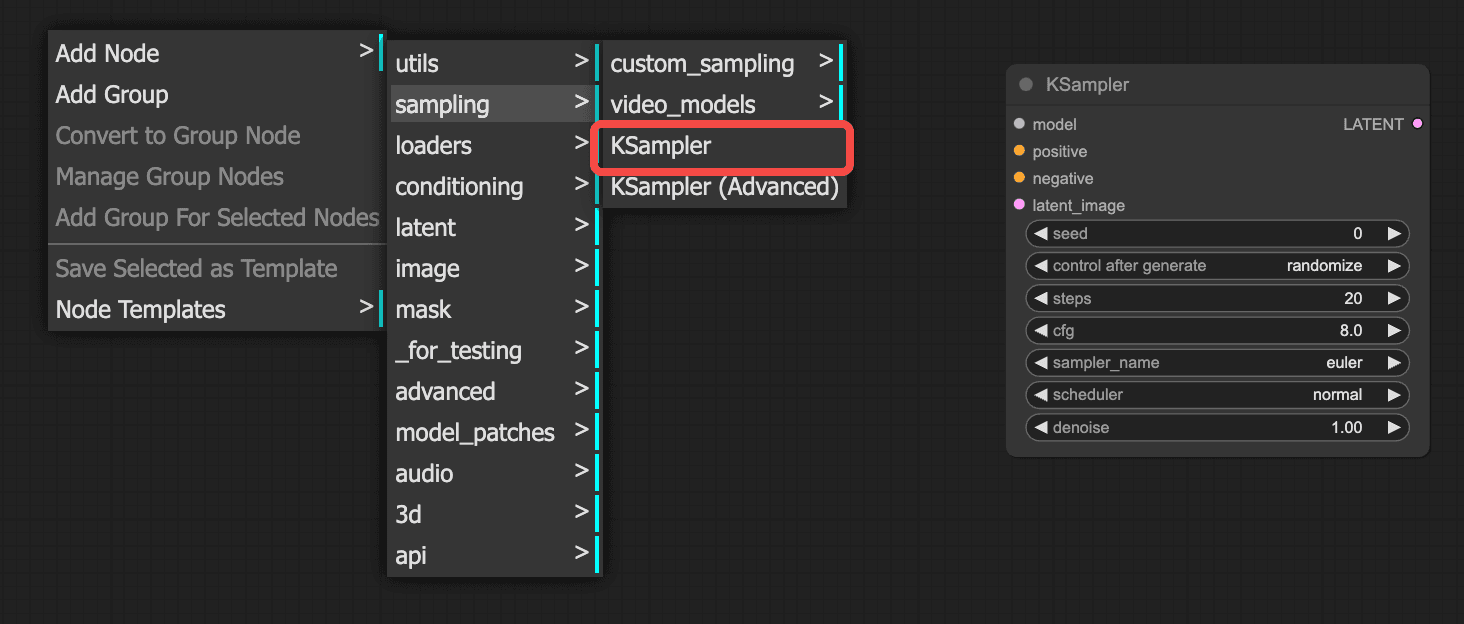
Introduction to Parameters in the "K Sampler"
Let's first introduce the parameter settings in the "K Sampler":
- Random Seed: Corresponds to the seed value in webUI. Each generated image will display its numerical value, with a default of 0.
- Post-run Operation: There are four options: Fixed, Increment, Decrement, and Random. These two parameters are used together. "Fixed" means keeping the value constant for the image, "Increment/Decrement" means increasing or decreasing the value by 1, and "Random" means generating a random value. Those familiar with webUI will easily understand this; generally, we use Fixed or Random.
- Steps: Refers to the iteration steps in webUI, usually set around 30-40.
- CGF: Corresponds to the prompt relevance in webUI. The larger the parameter, the closer the image effect is to the prompt. The smaller the parameter, the more creative freedom the AI has, resulting in images that may differ more from the prompt. It is generally set around 10, with a default of 8.
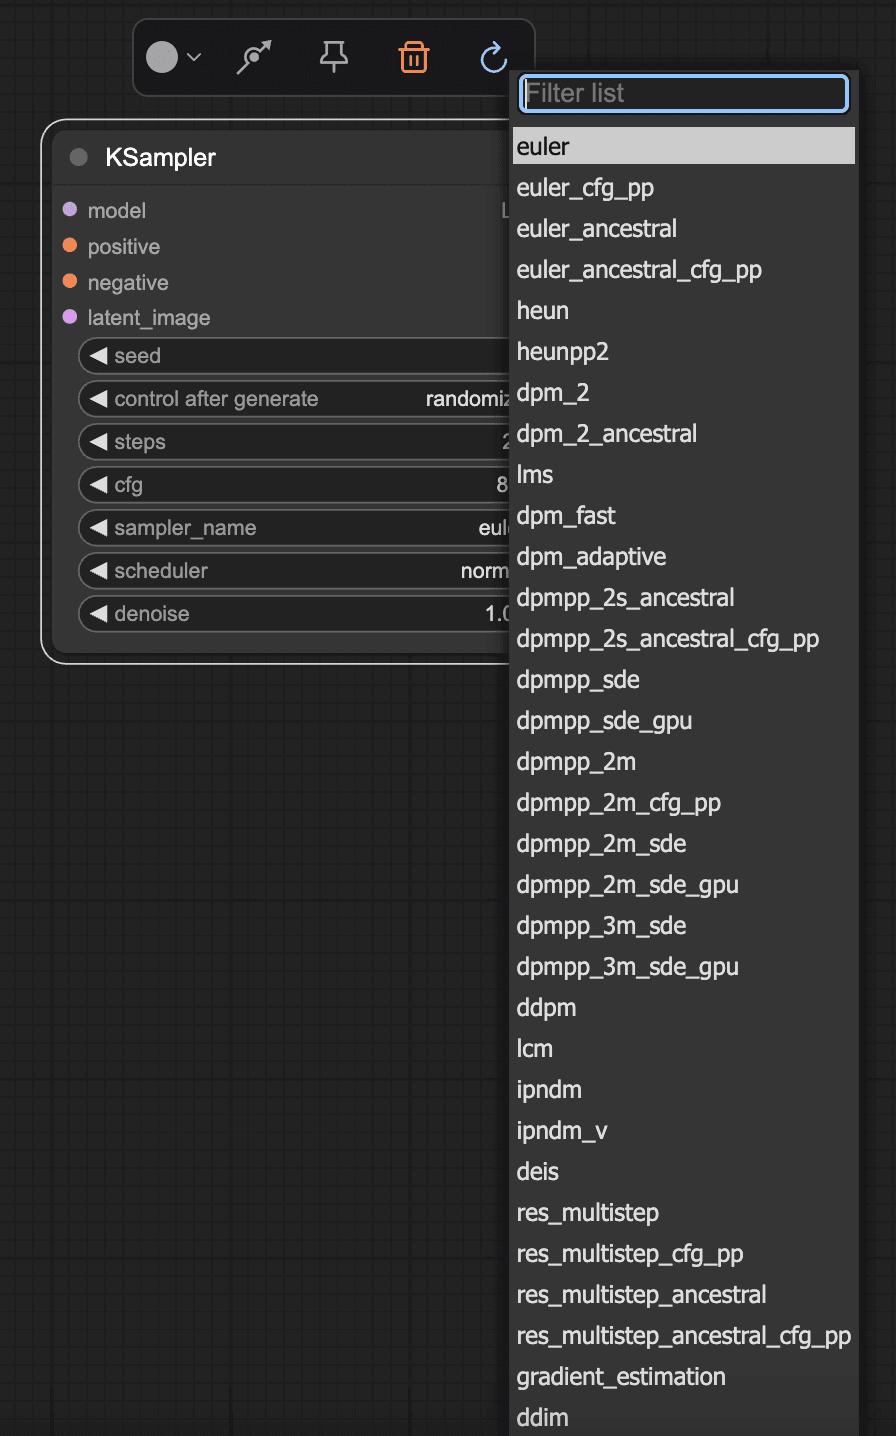
- Sampler and Scheduler Usage
The sampler is used in conjunction with the scheduler, corresponding to the sampling methods in webUI, such as the commonly used dpm++_2m Karras.
- Sampler: Generally, optimized or the latest samplers are used, such as:
euler_ancestral(abbreviated aseuler a)dpmpp_2mseriesdpmpp_3mseries
- Scheduler: Typically,
normalorkarrasis used.
The denoising parameter generally doesn't need to be adjusted. It corresponds to the iteration steps, and the default value of 1 is usually sufficient.
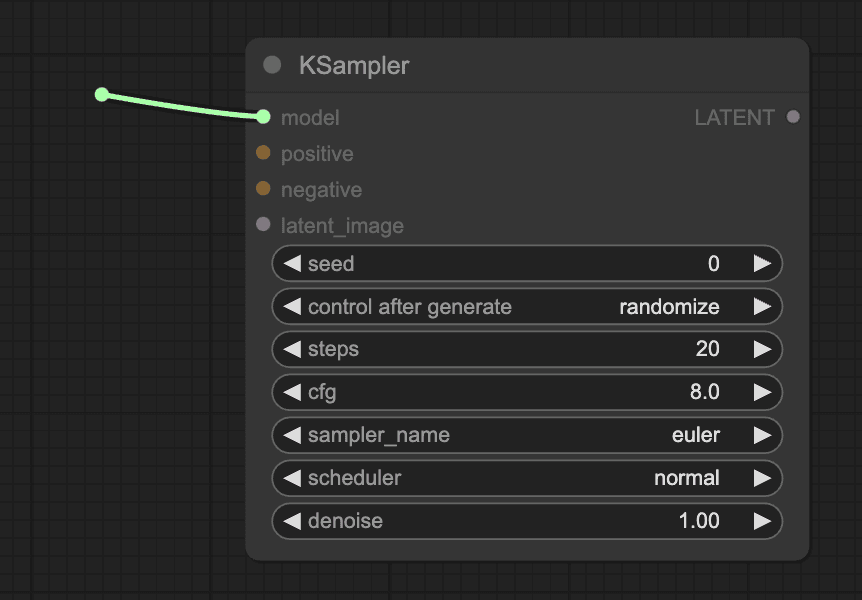
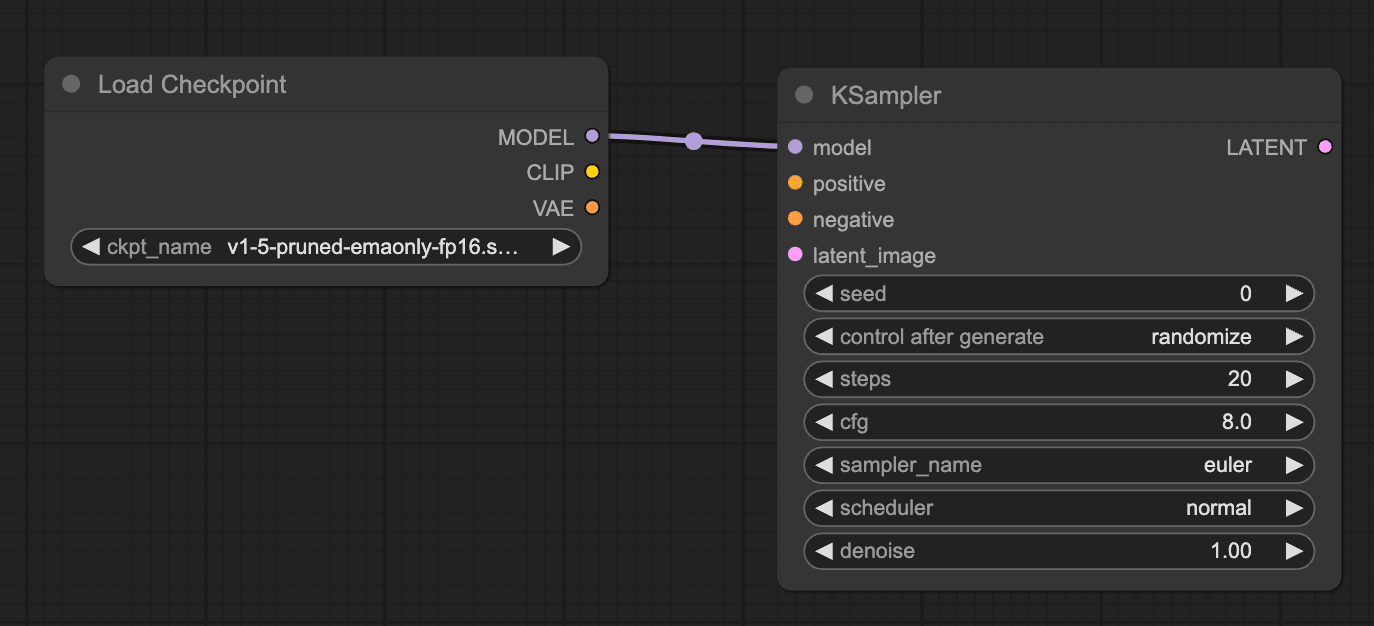
Step 2: Add "Load Large Model"
In the second step, add the "Load Large Model" node. As shown in the figure, simply drag the model connection point to bring up the function panel and add the "Checkpoint Loader." This method of adding nodes can be reused in subsequent steps, so it won't be demonstrated repeatedly.

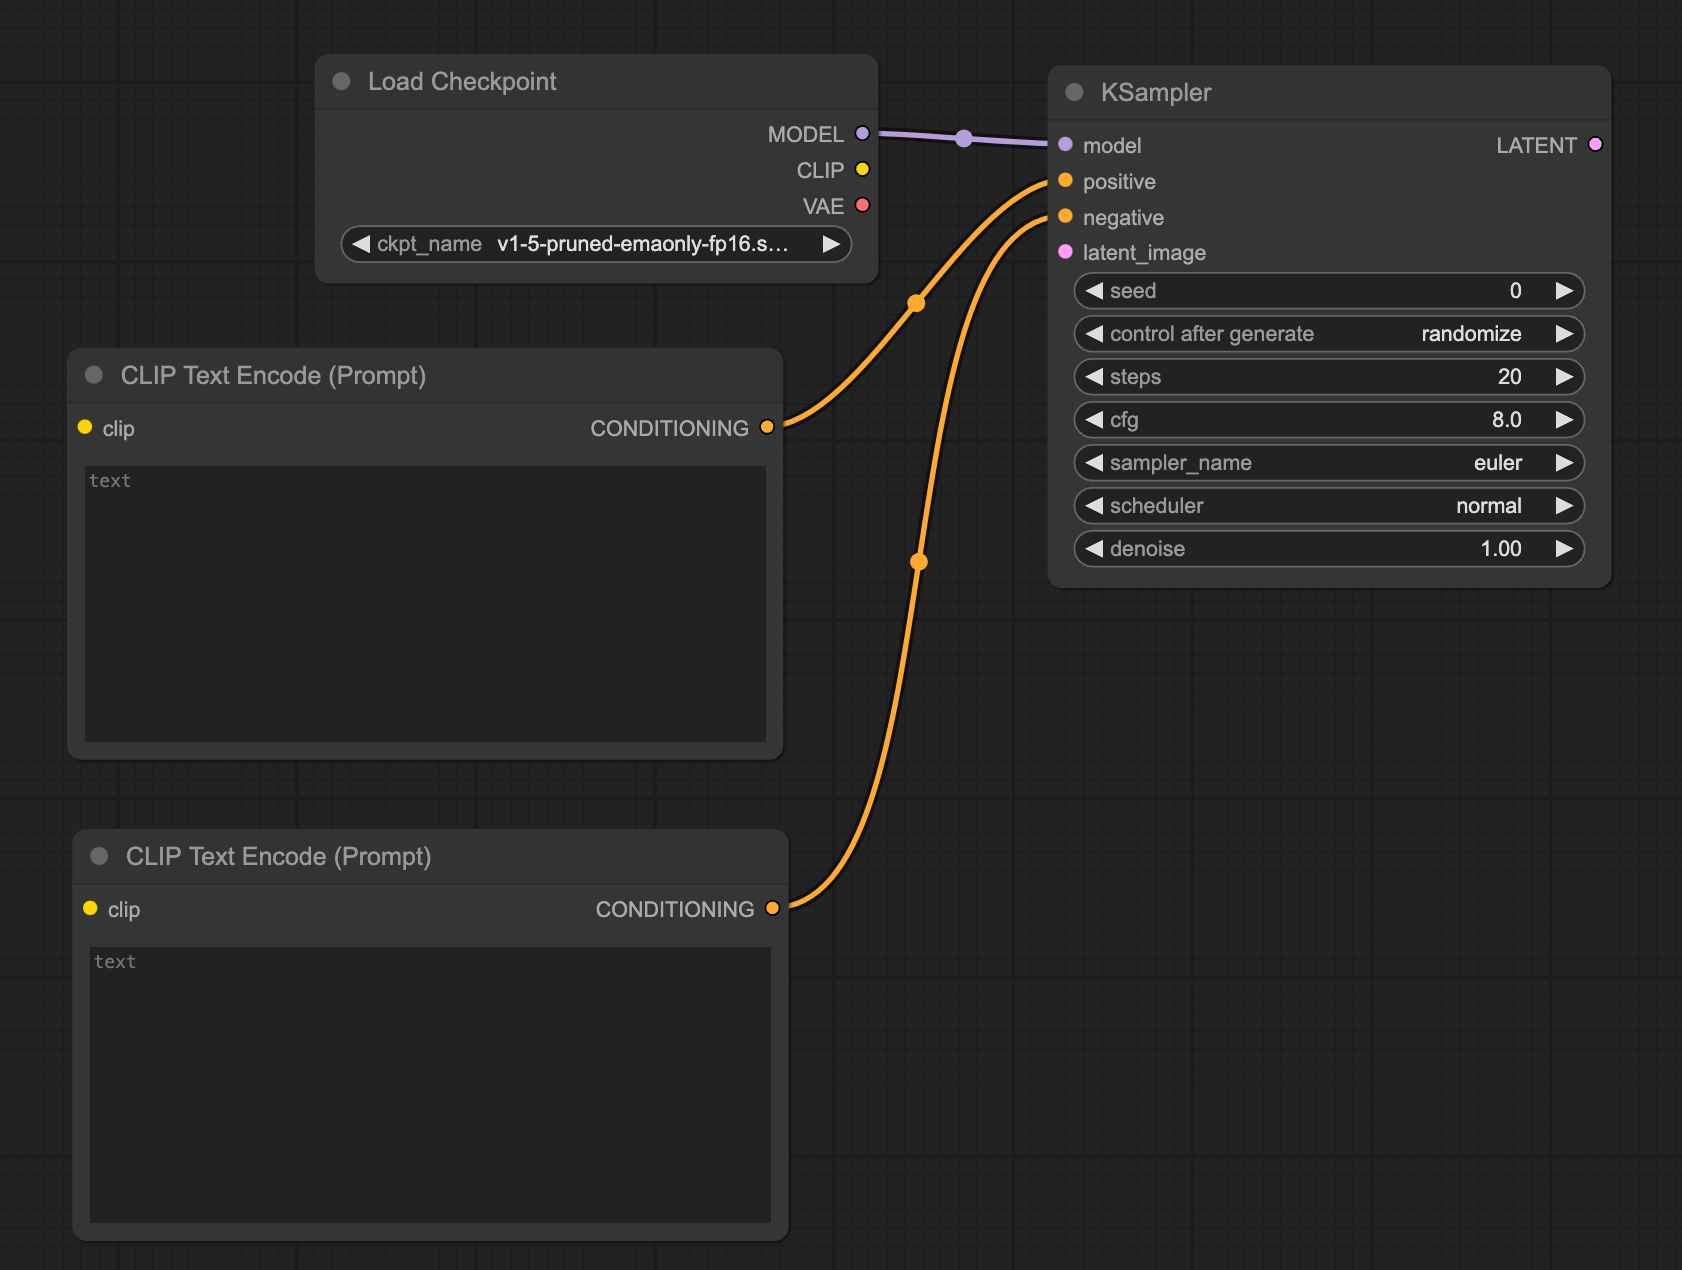
Step 3: Add "Positive and Negative Prompt"
Add the positive prompt input node using the method described above, as shown in the figure:
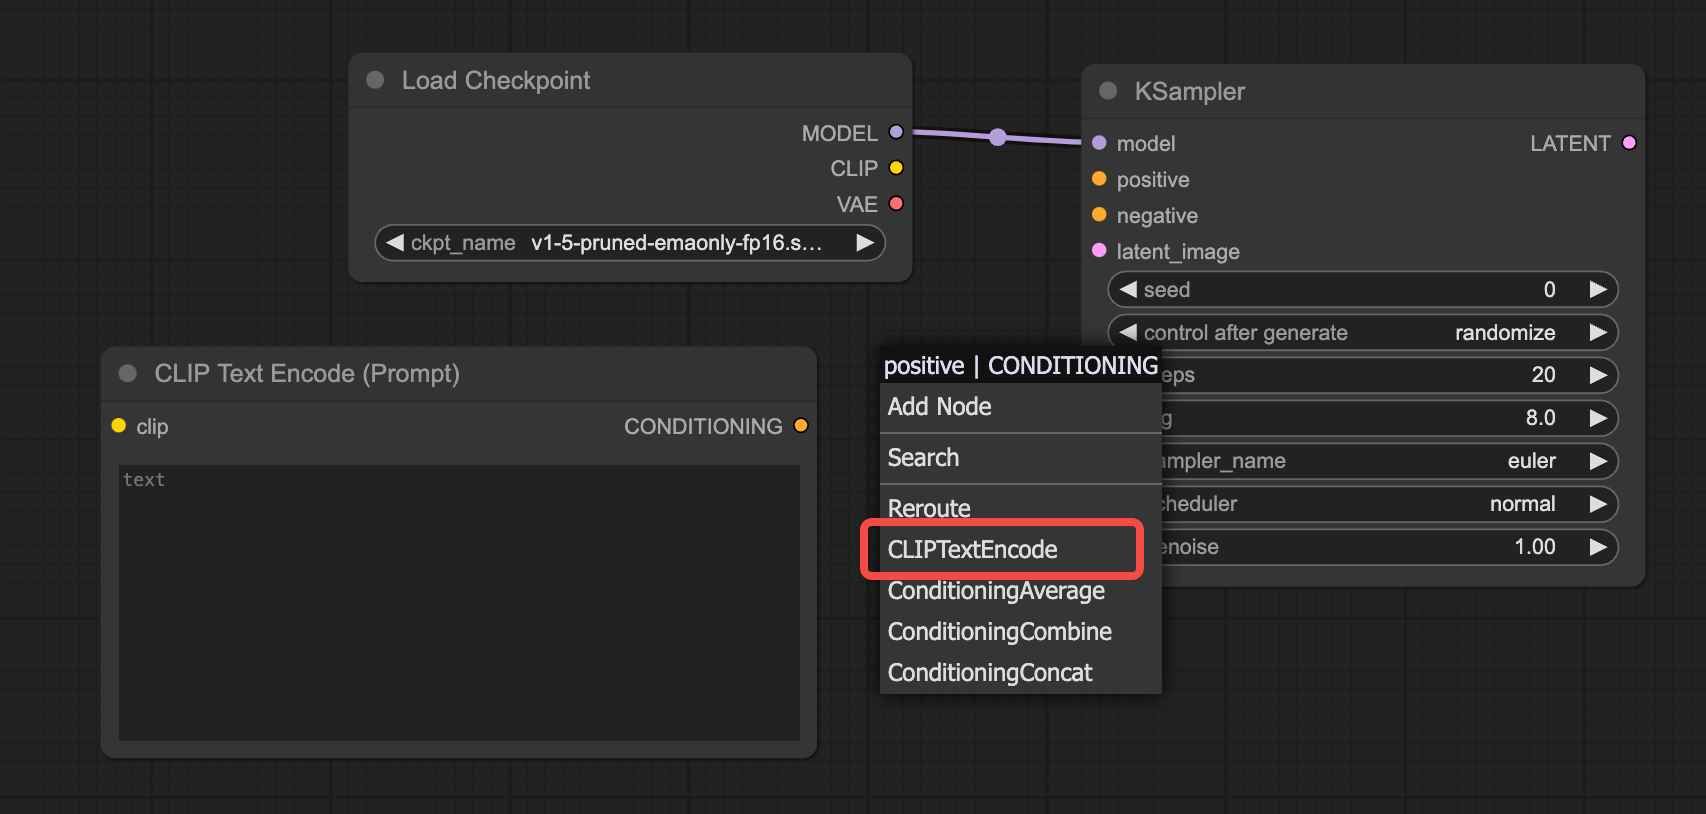
The negative prompt input area can be added in the same way by dragging the connection point of the "Negative Condition."
However, here we demonstrate the copy-paste method. Select the "CLIP Text Encoder" node, press Ctrl+C to copy, then Ctrl+V to paste, and connect the two colored nodes:
Alternatively, you can select the "CLIP Text Encoder" node, hold down the Alt key and left-click to drag and duplicate the node. Feel free to try this method.
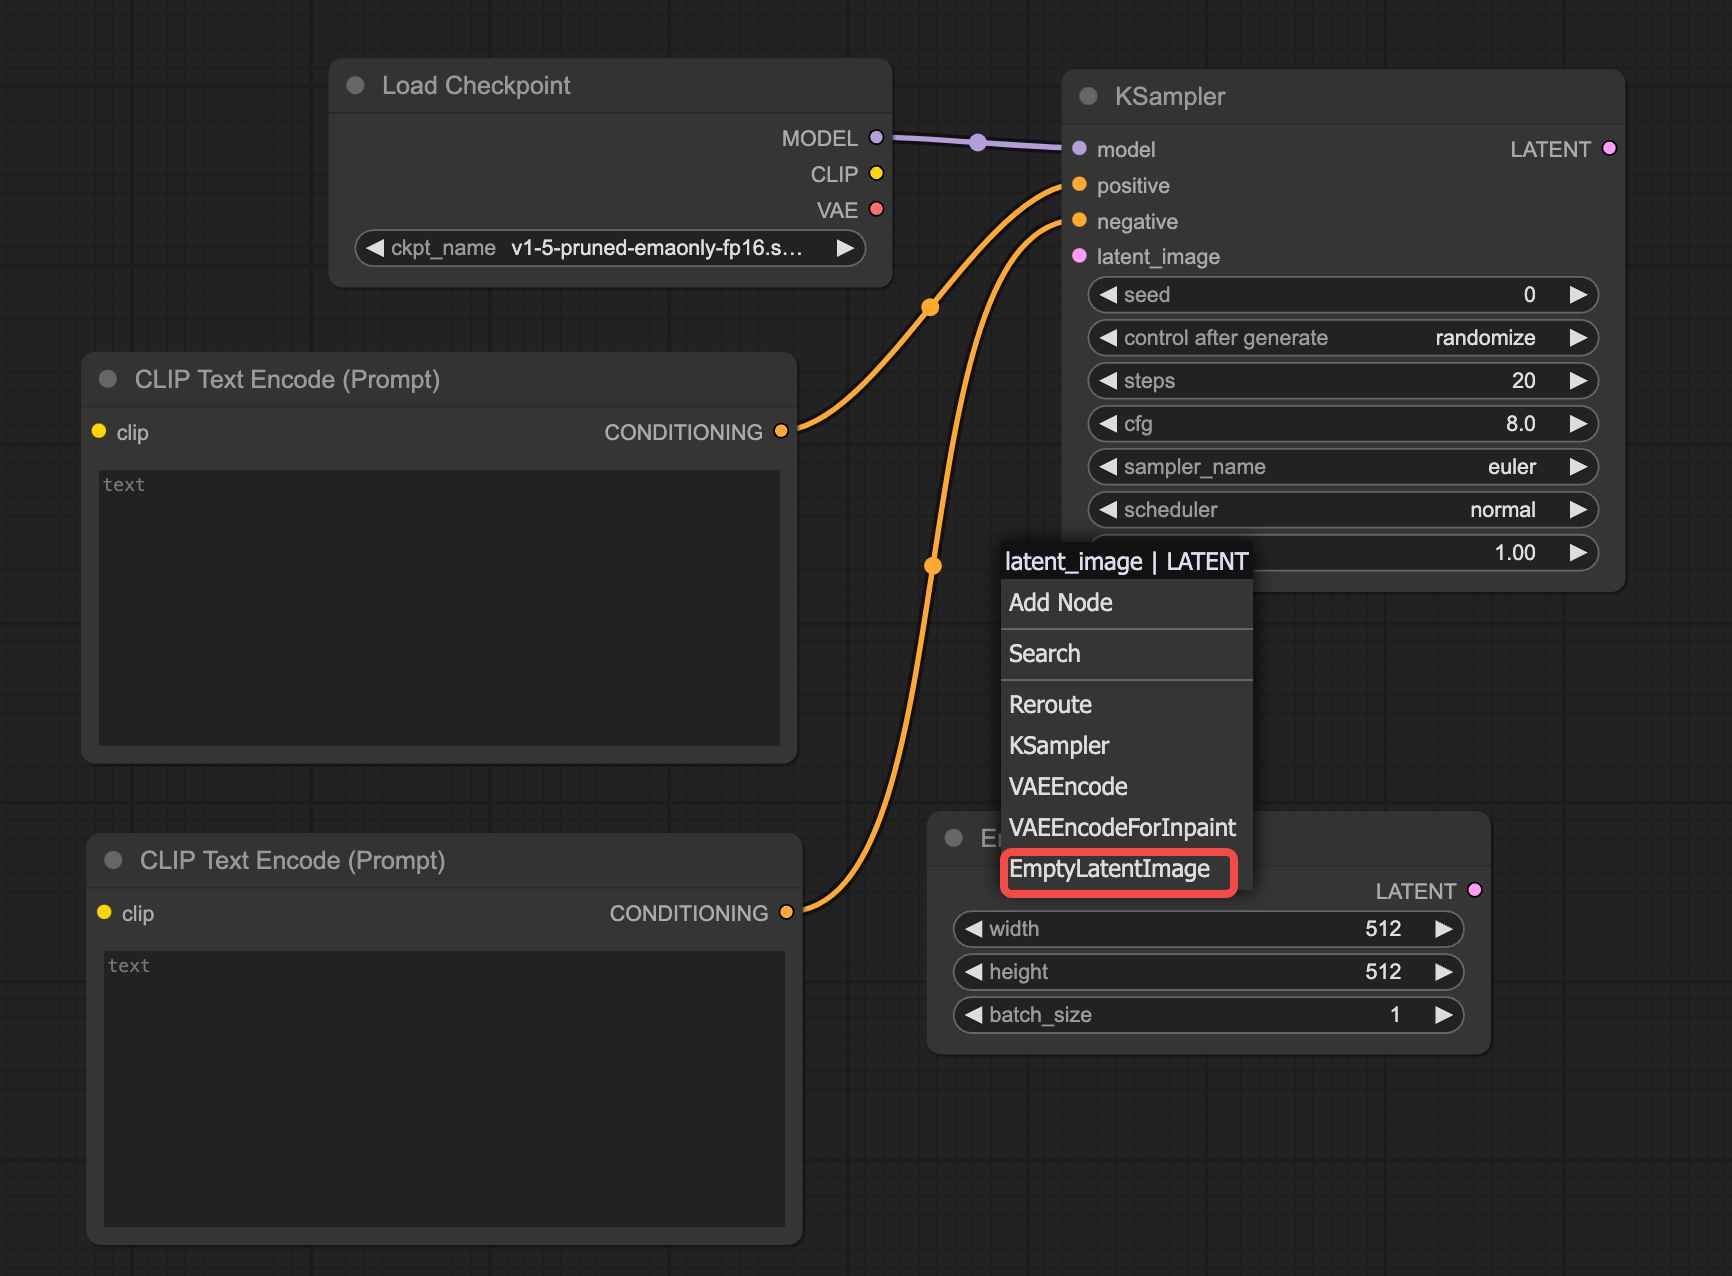
Step 4: Add "Image Size/Batch"
Drag the "Latent" connection point and select "Empty Latent" to add the "Image Size/Batch" node. This node allows you to adjust parameters such as width, height, and batch size. These parameters are self-explanatory for those familiar with webUI.
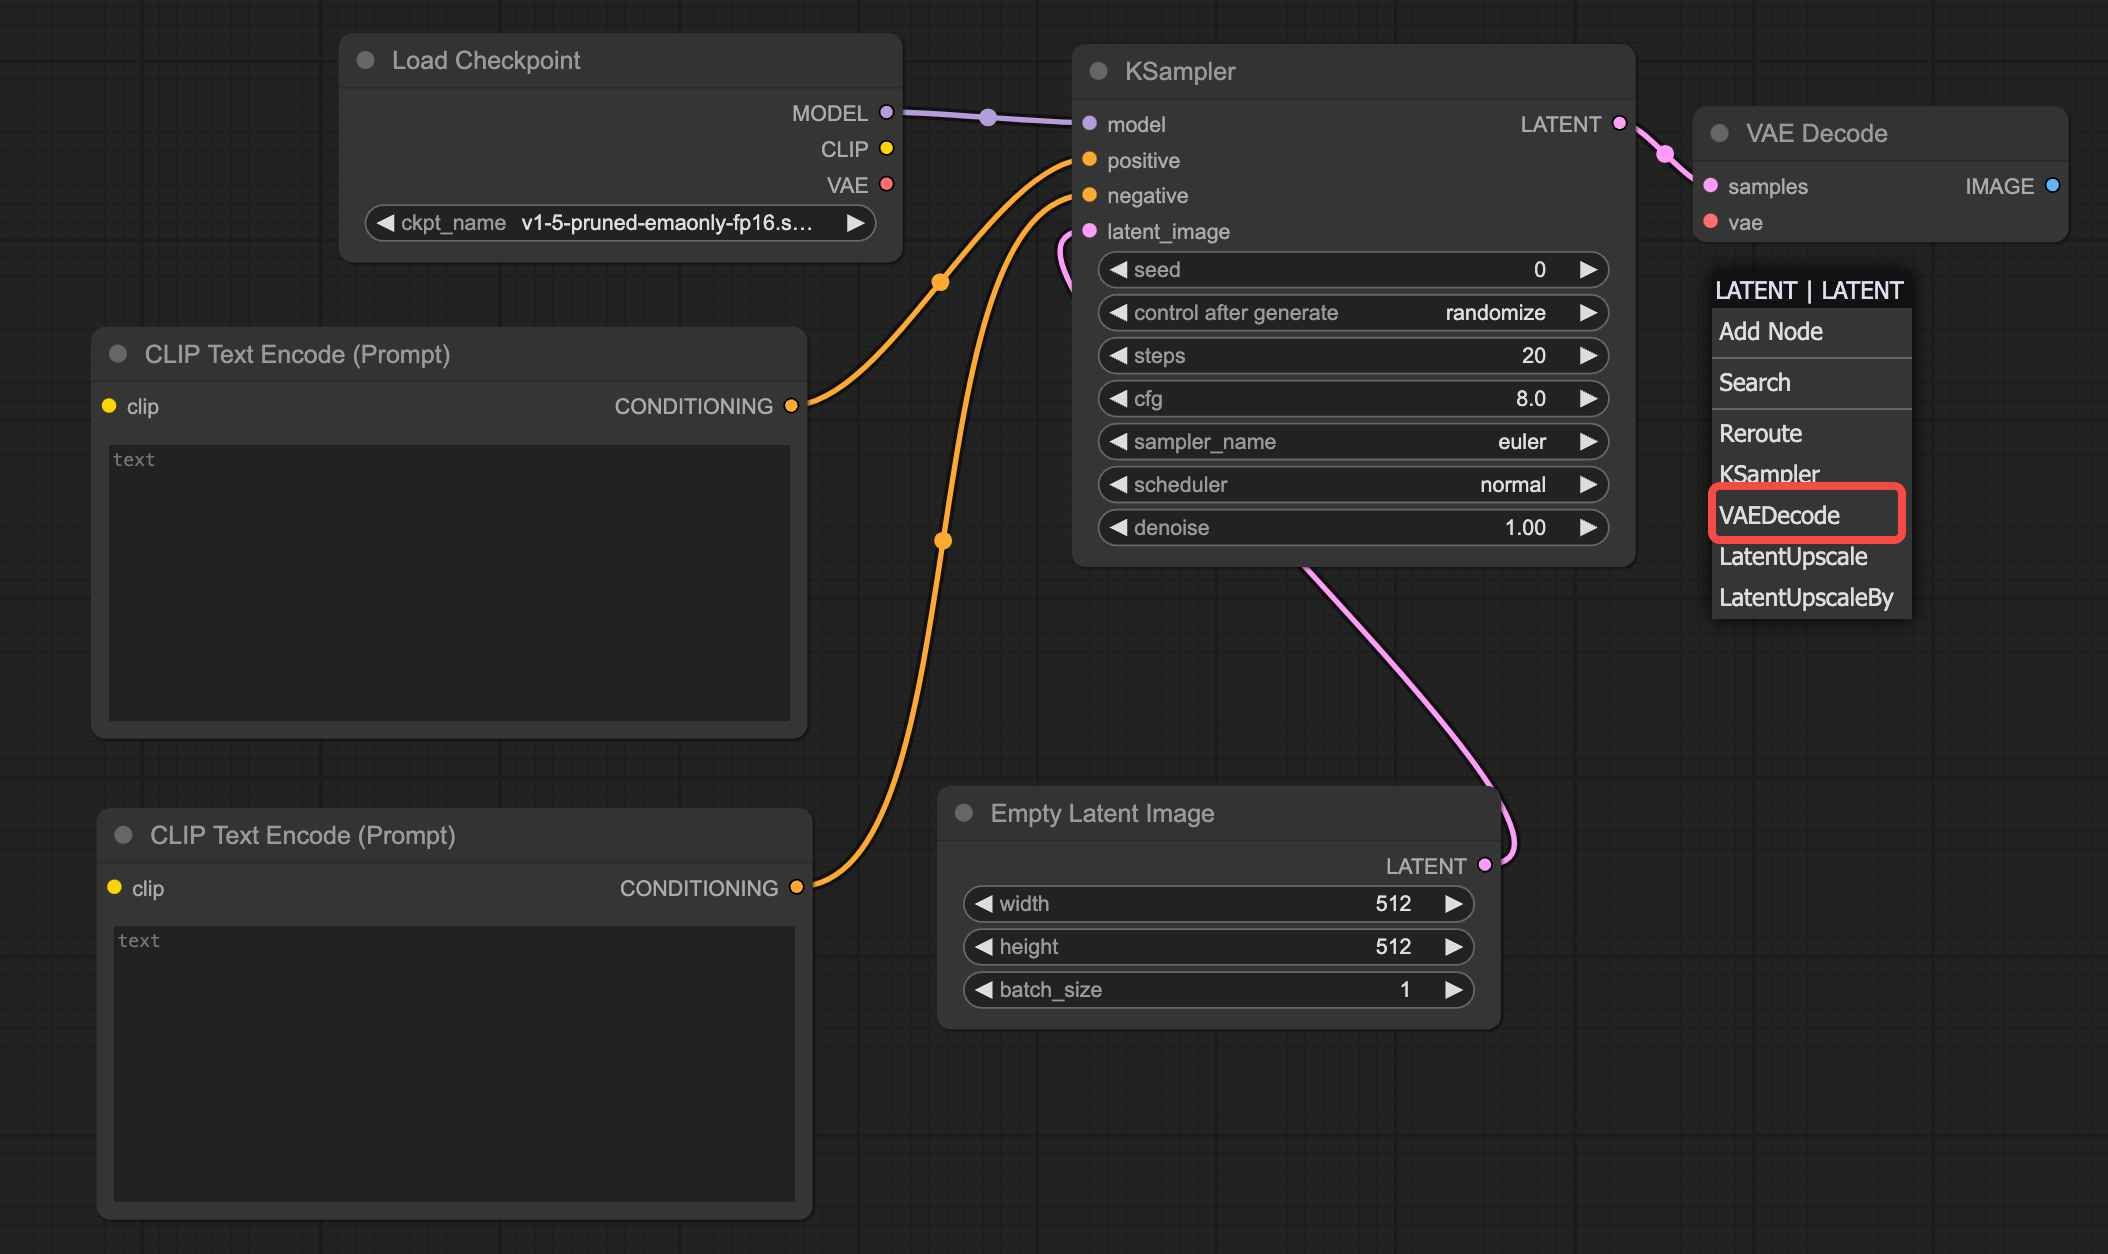
Step 5: Add "VAE Decoder"
Drag the "Latent" connection point and select "VAE Encode" to add the VAE.
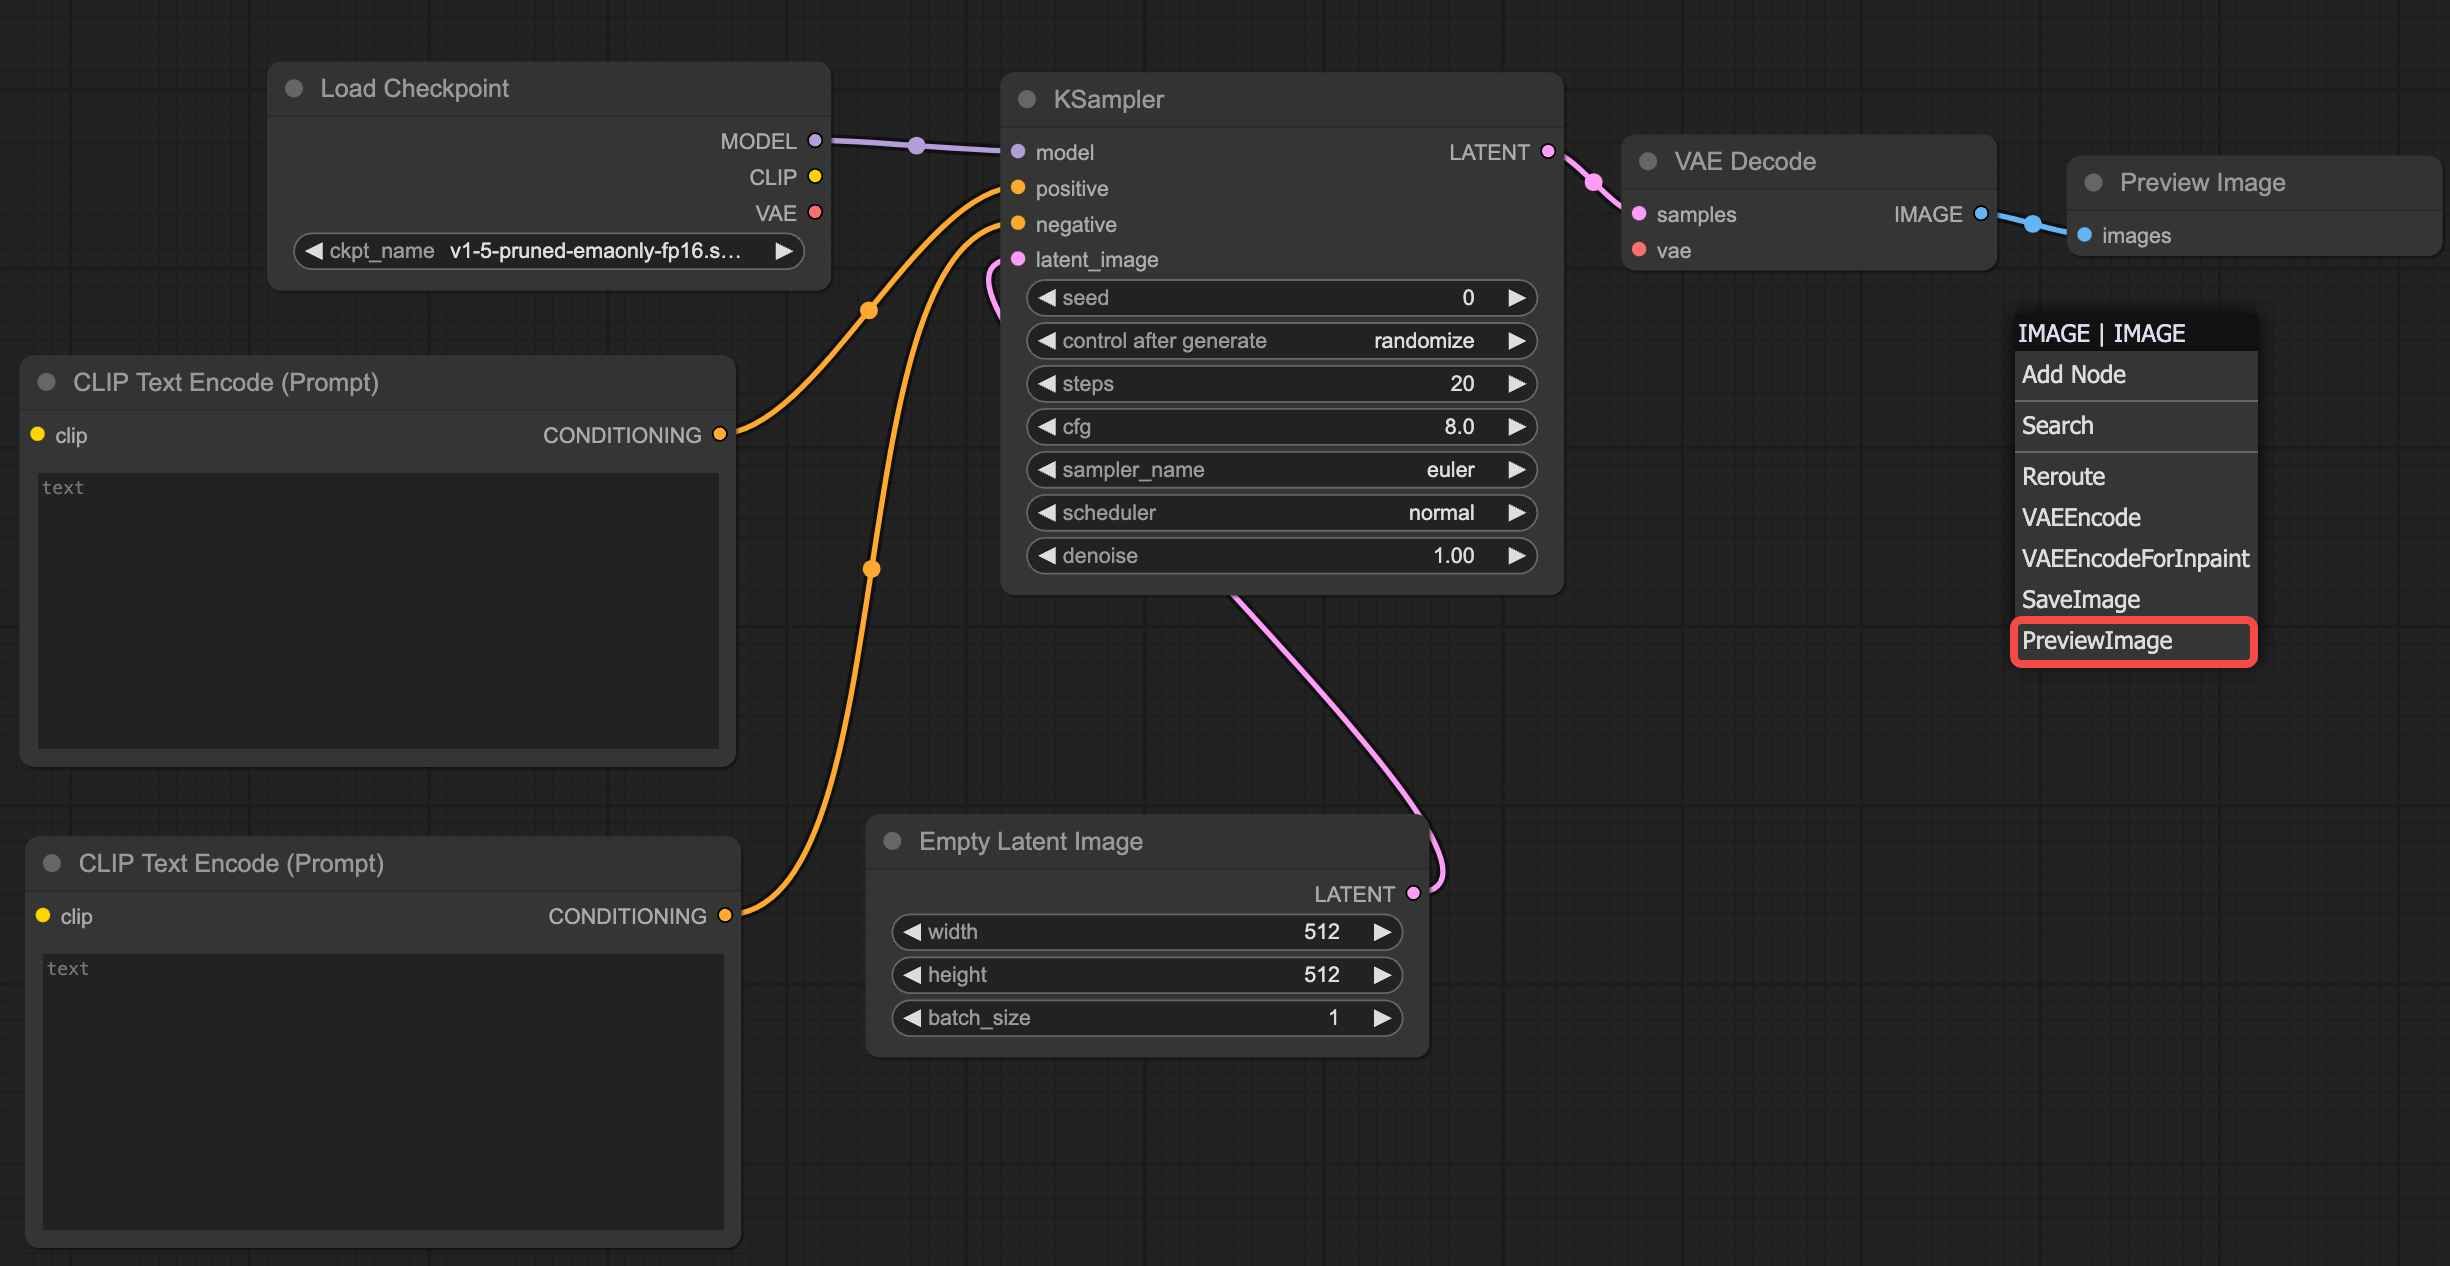
Step 6: Add "Image Generation Area"
Drag the "Image" connection point and select "Preview Image" to successfully add the image generation area.
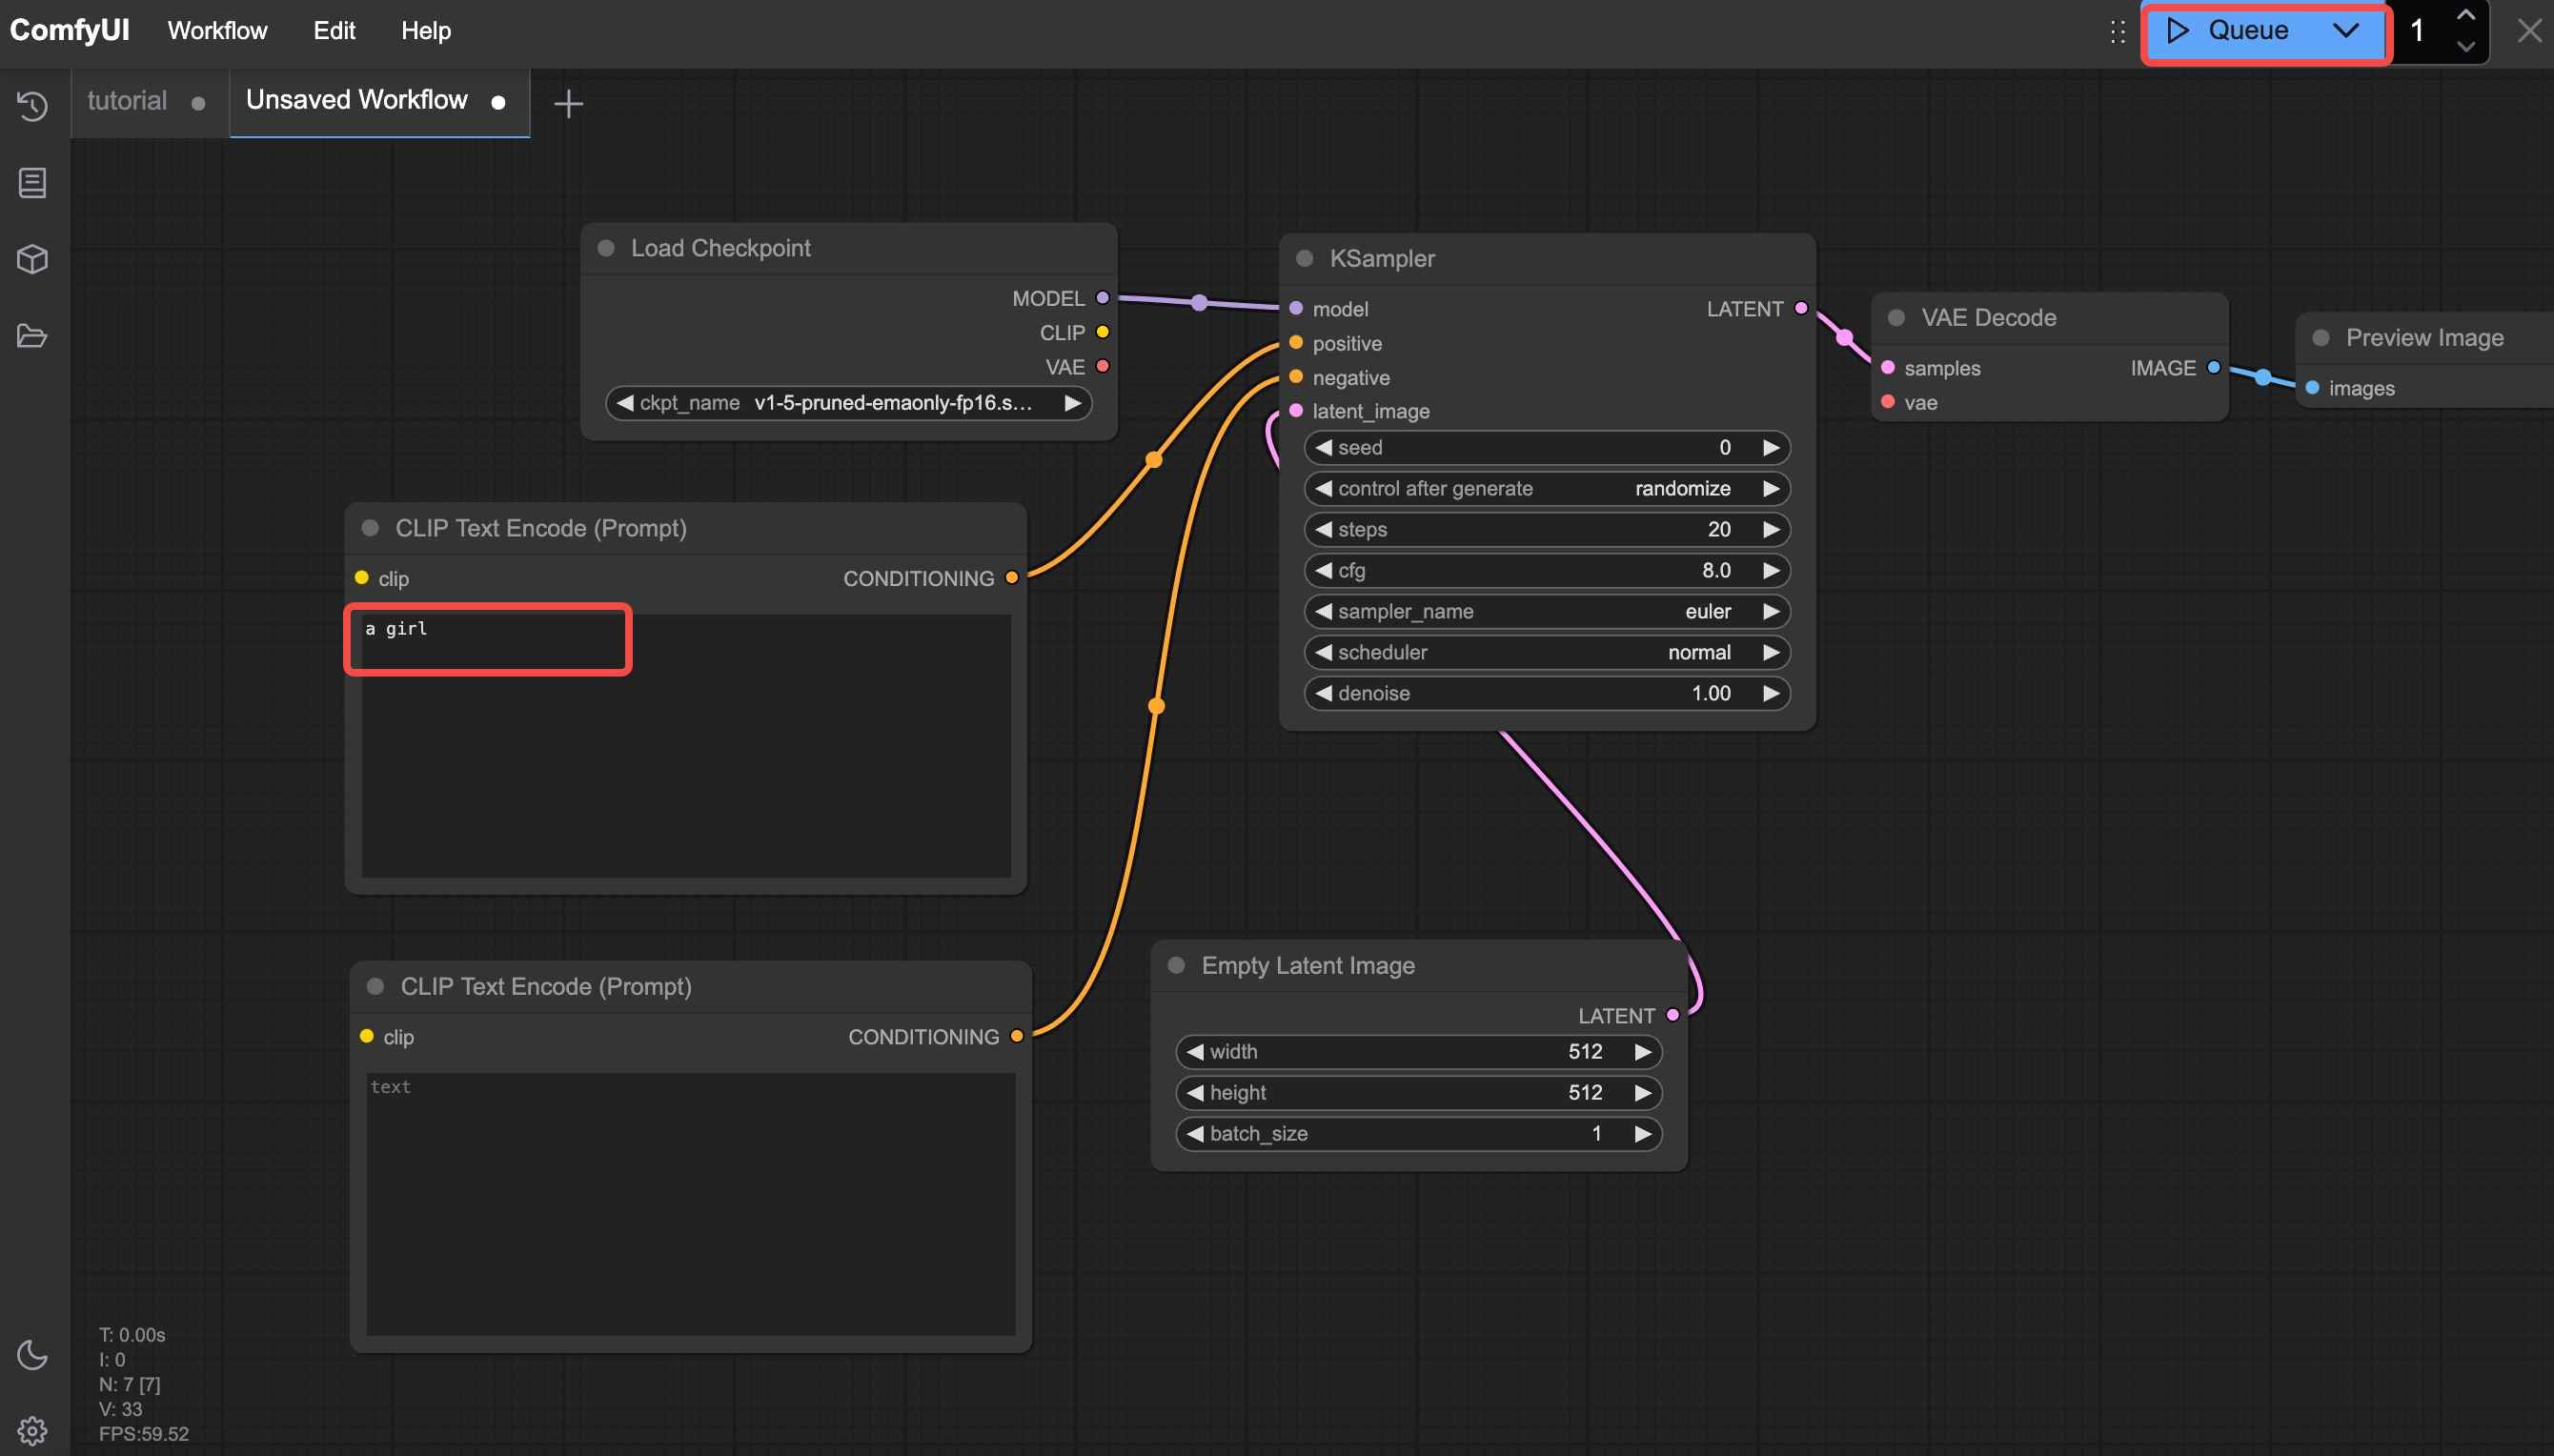
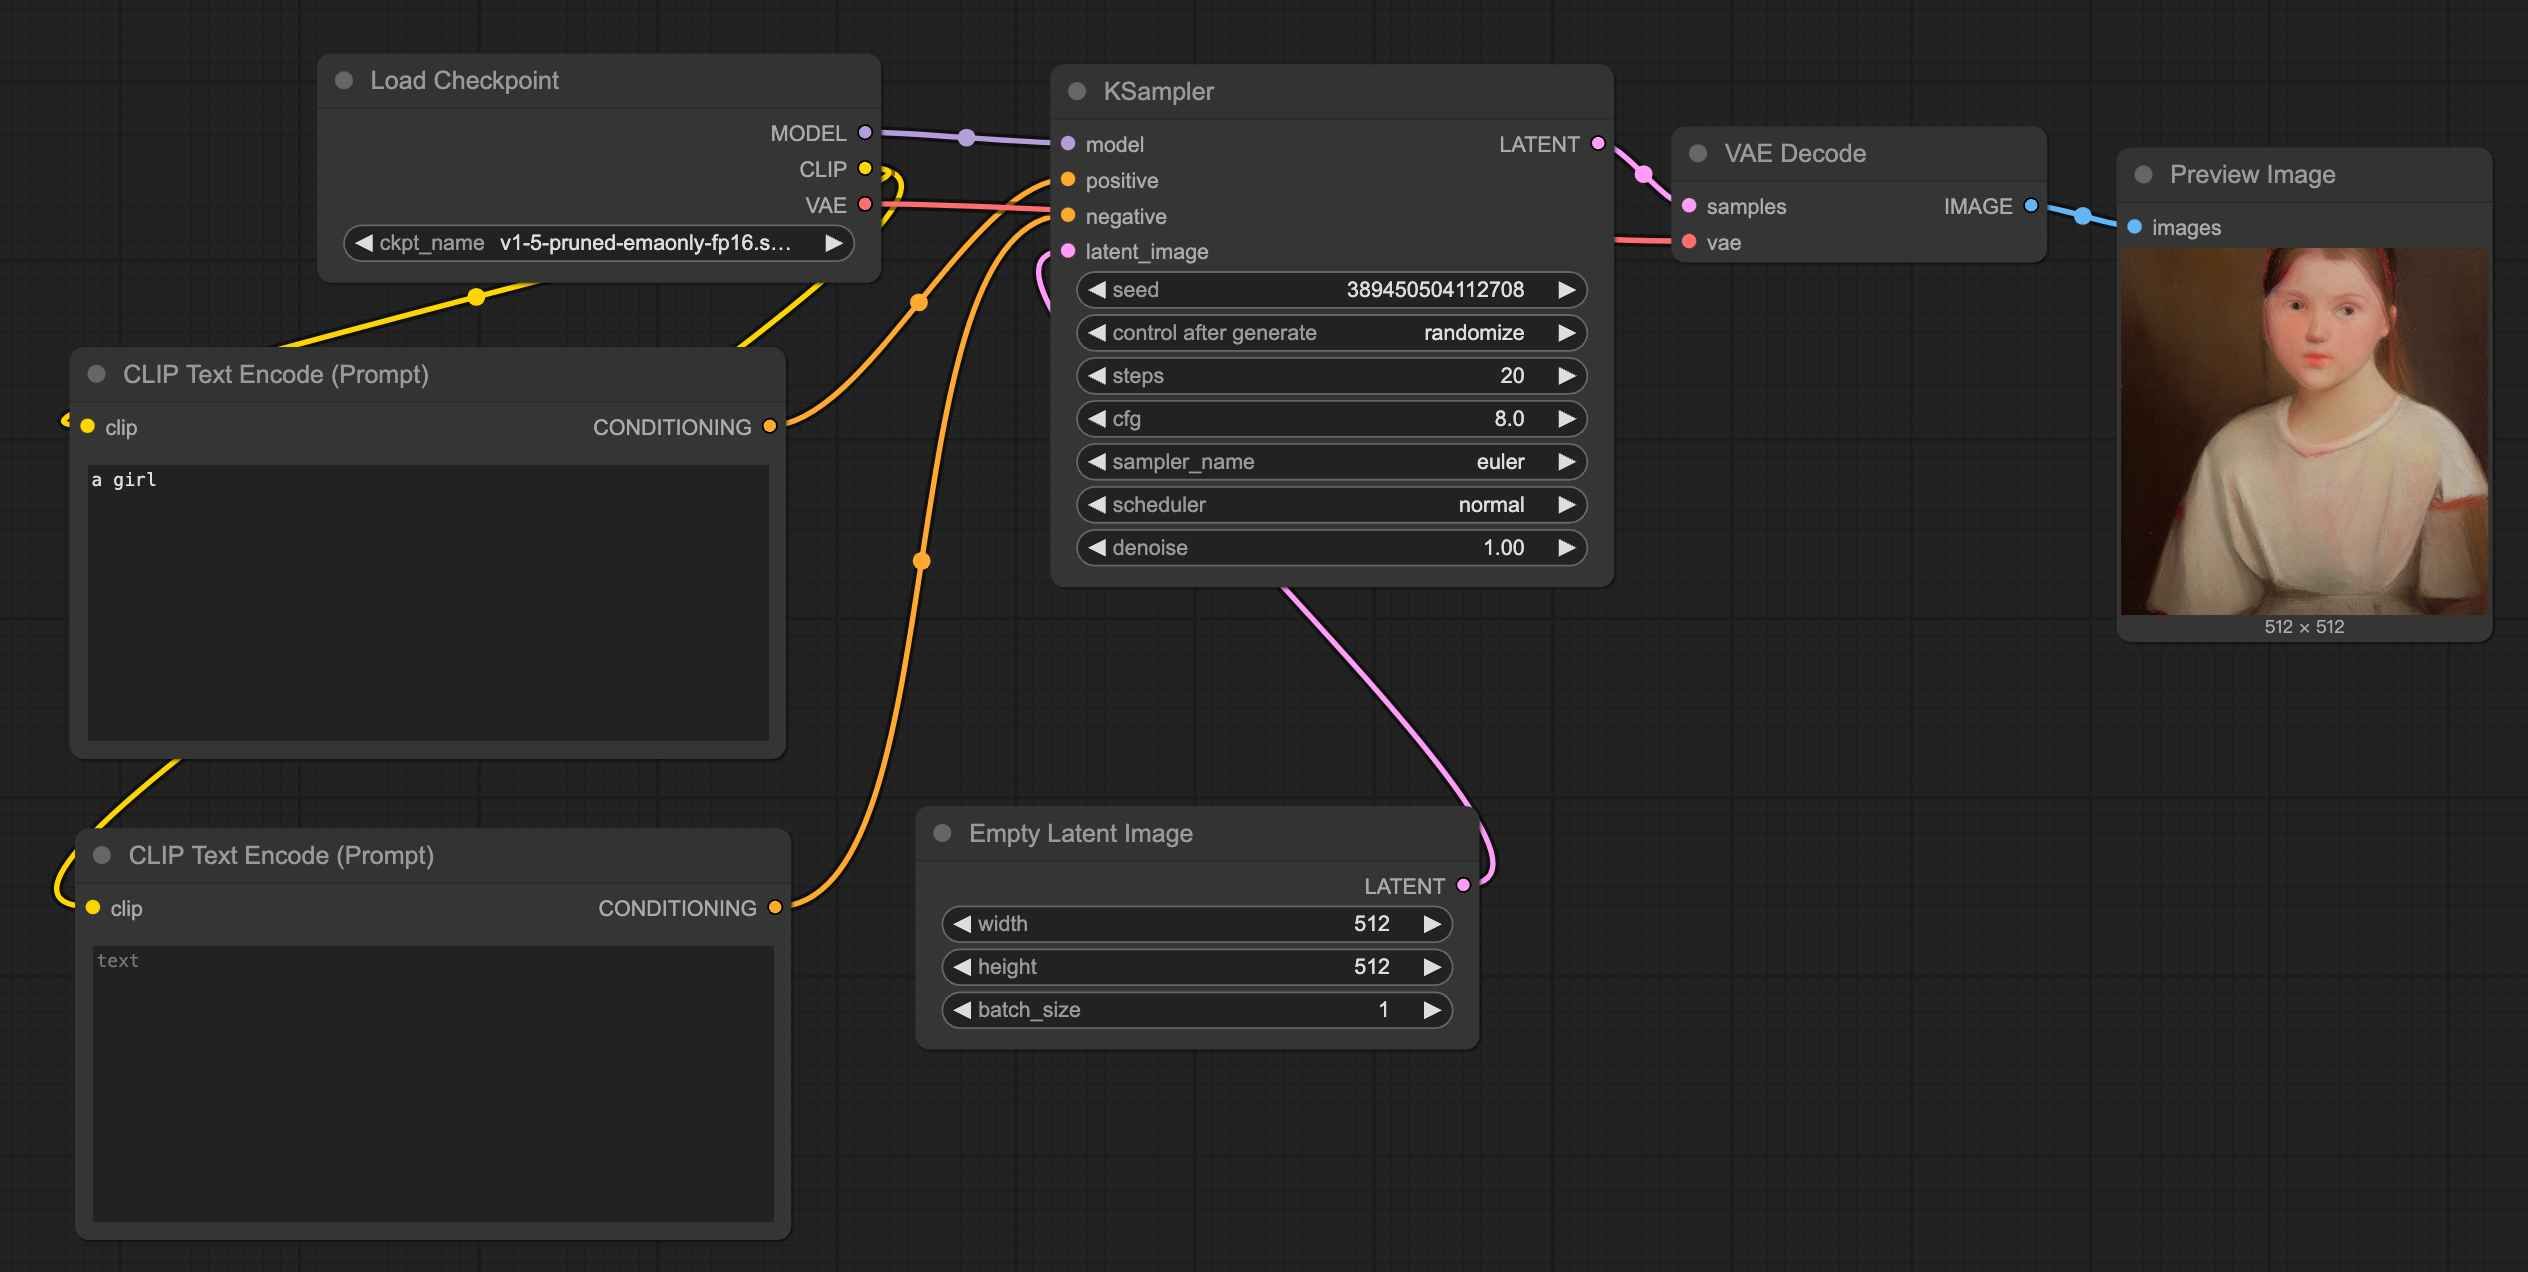
At this point, all the nodes required for the text-to-image workflow have been successfully added. You can now click " Queue" to test image generation. Before doing so, enter a prompt (e.g., "a girl") in the positive prompt input area.
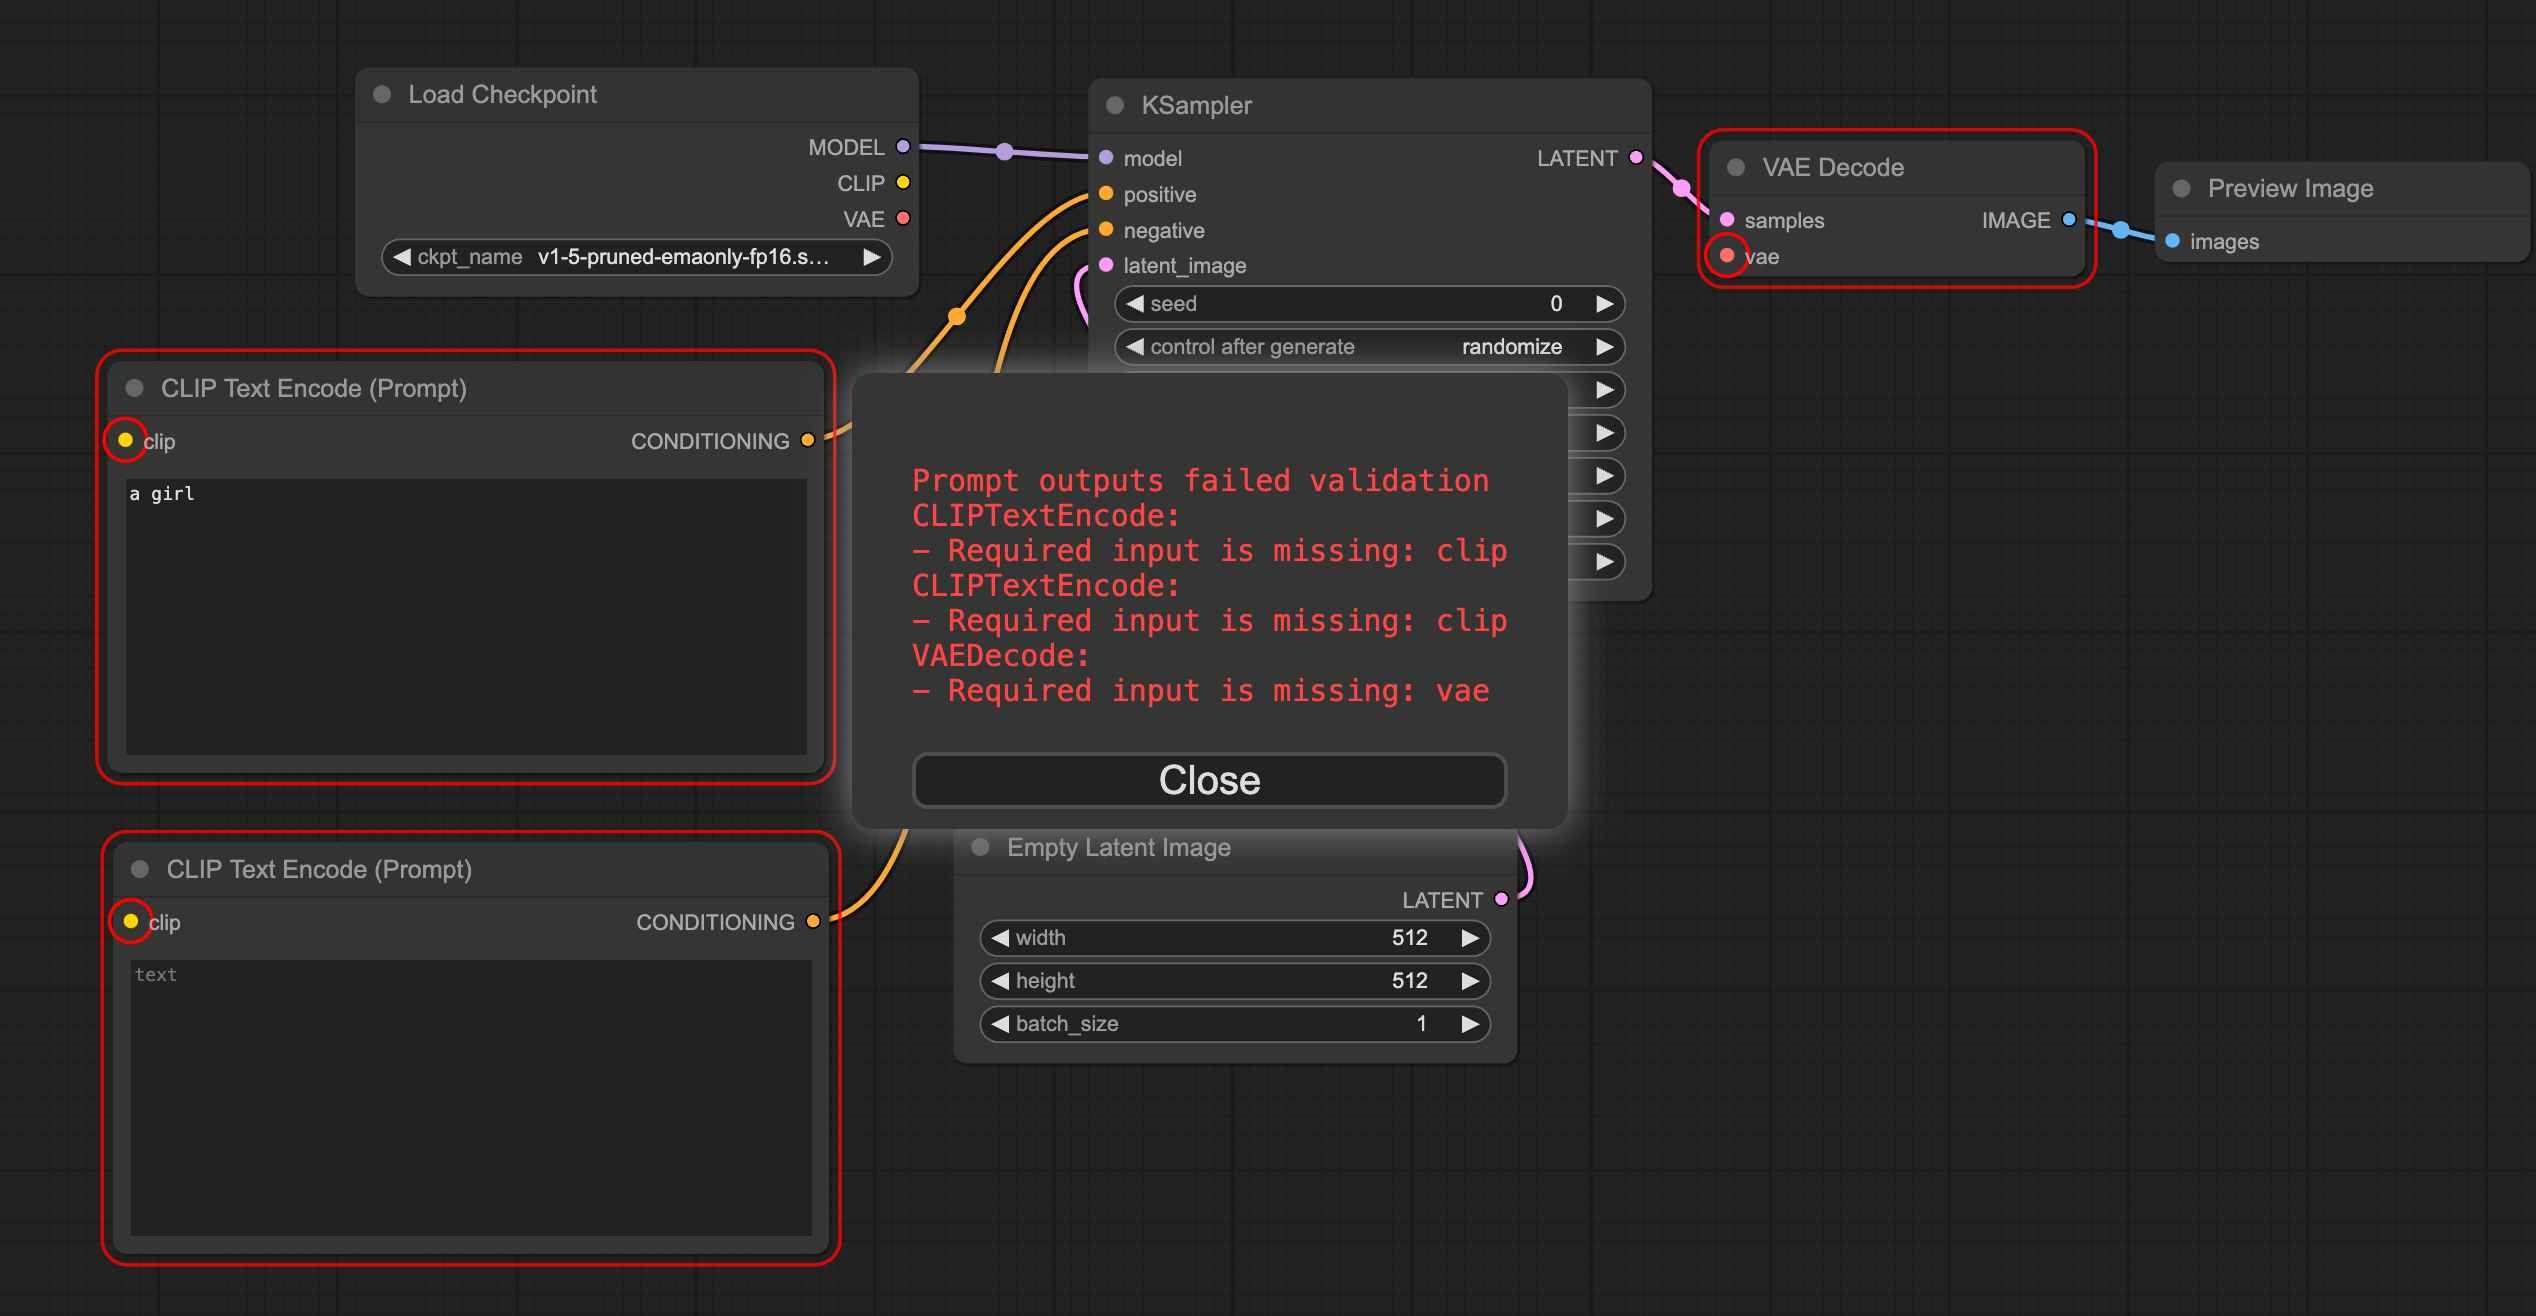
If you click generate at this point, like I did, you will encounter an error as shown in the red box in the image and the red annotations on the nodes. The reason for this is that these highlighted nodes are not properly connected.
Next, we need to correct these error nodes by connecting them properly. Pay attention to the colors of the connection points. If the connection point is yellow, it needs to be connected to the corresponding yellow connection point (matching names), as shown in the figure:
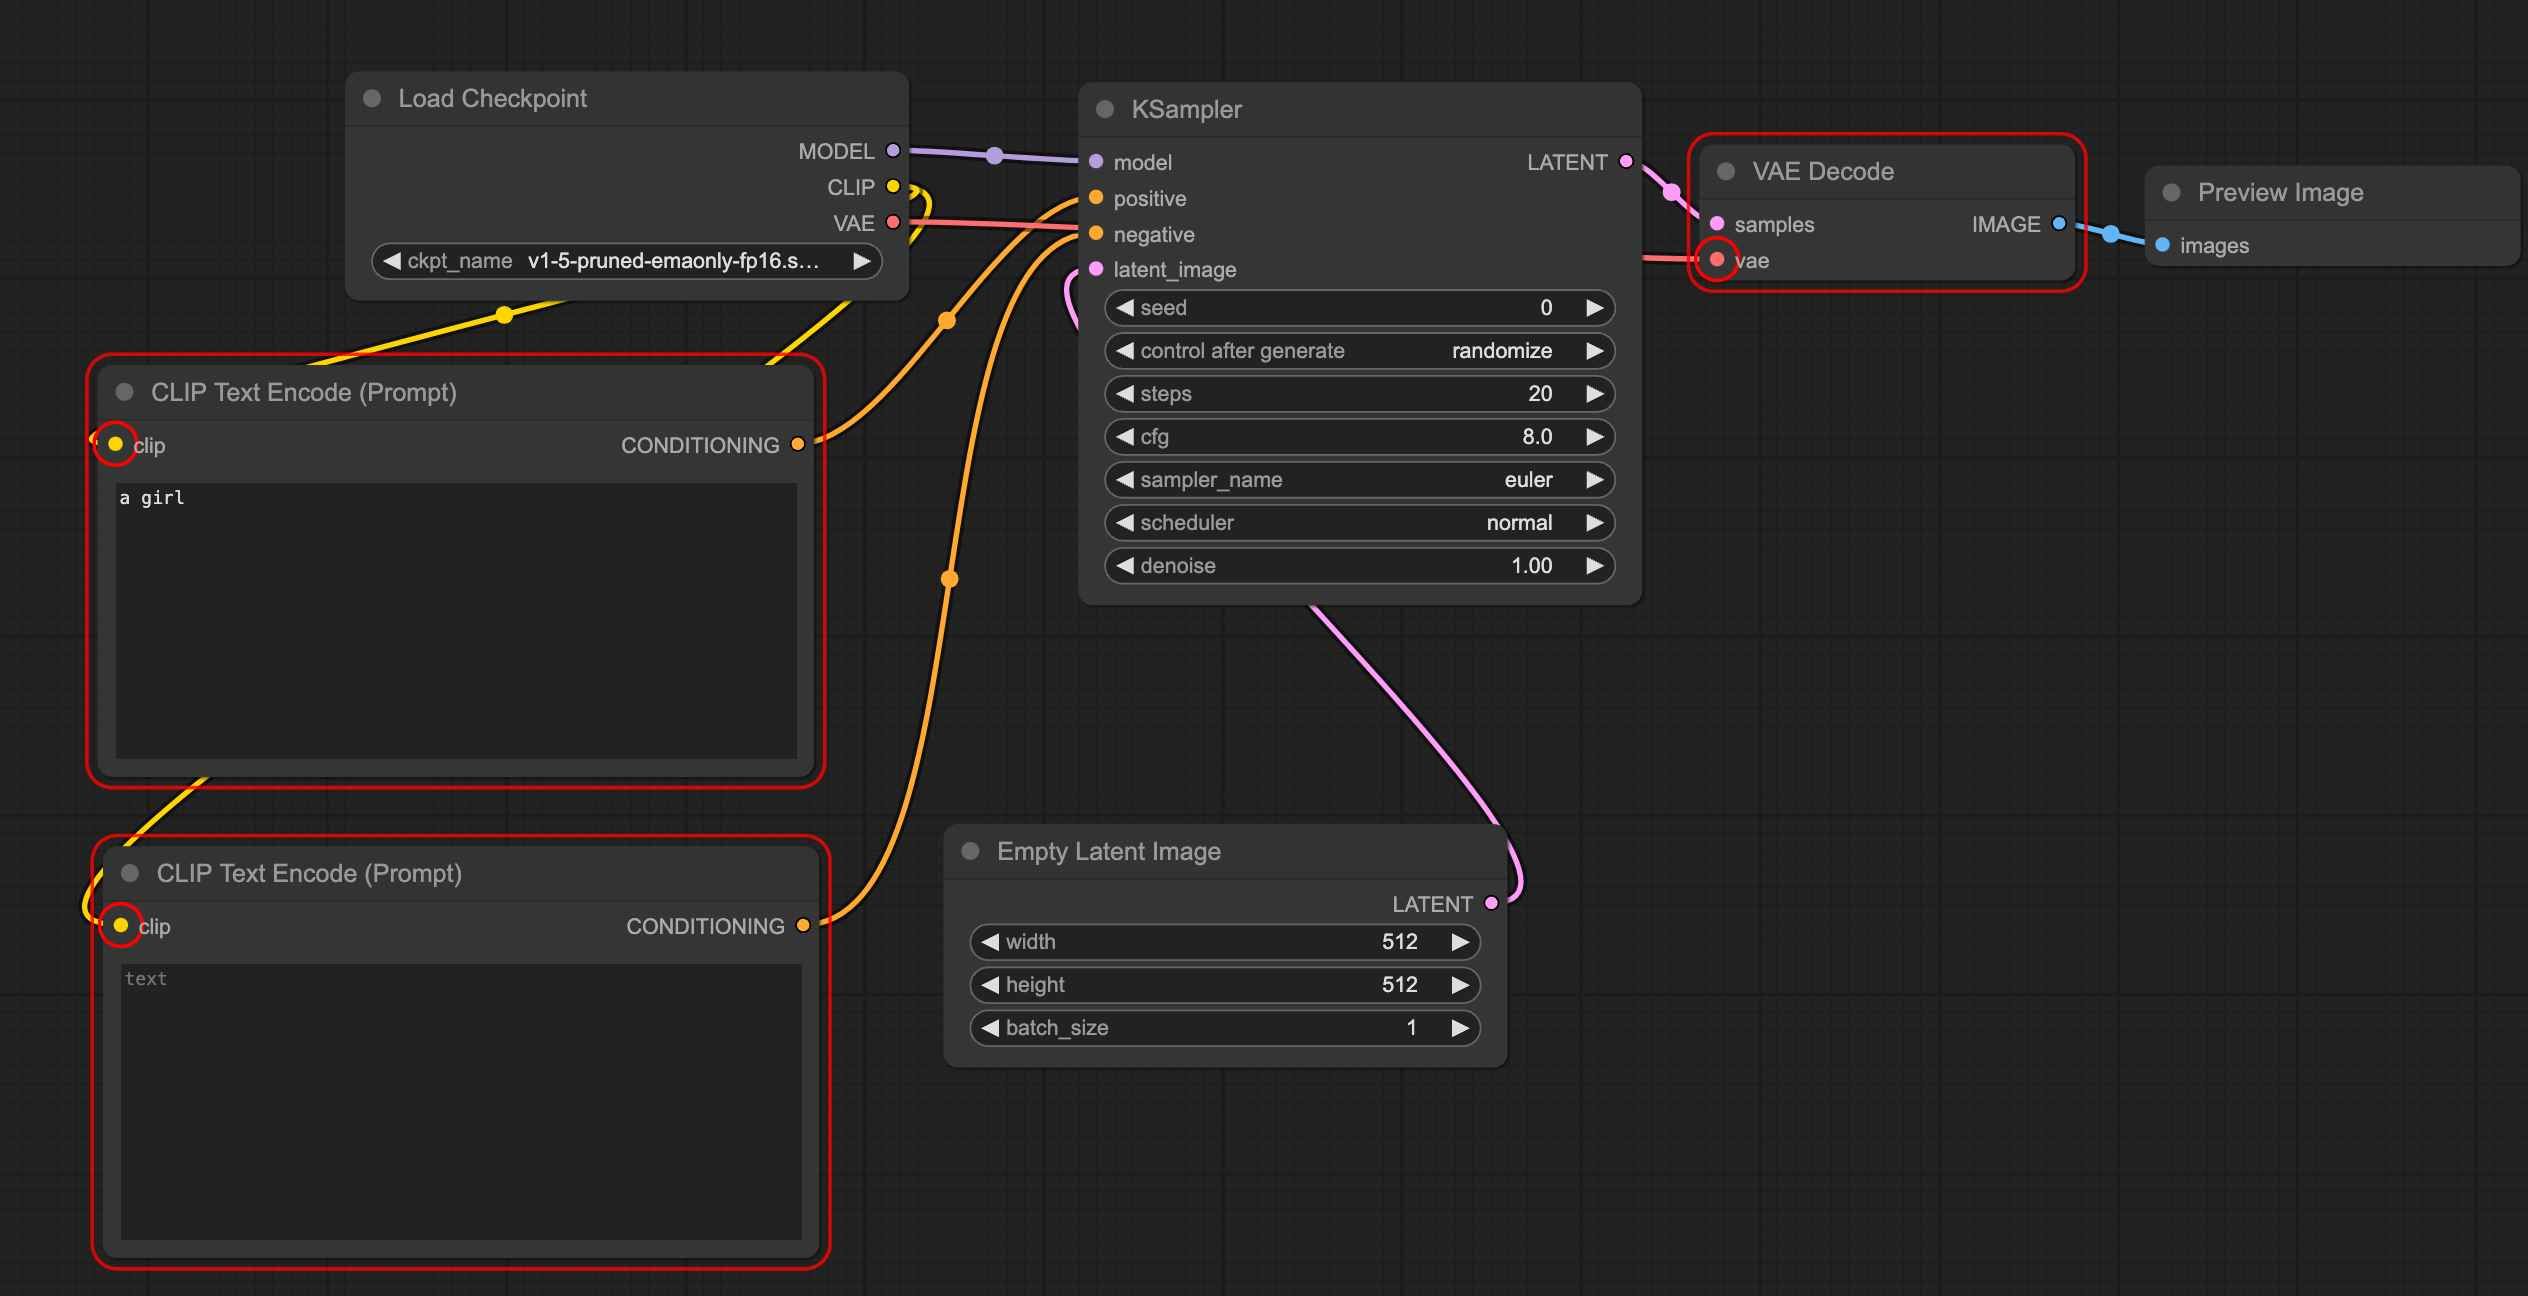
Then, click generate again. Congratulations, you have successfully completed the setup of this text-to-image workflow.
Workflow Reusability
By now, you've basically learned how to operate ComfyUI to generate images. Besides its high degree of freedom and flexibility, ComfyUI's biggest feature is the ability to directly reuse workflows shared by others. With just a small file or an image, the entire workflow can be replicated in our interface.
So, let me show you how to do it. Read on:
- Saving a Workflow
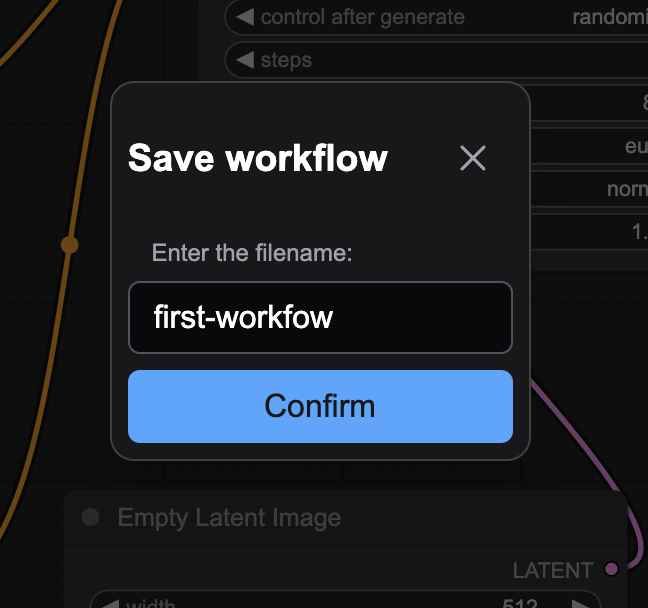
First, let's save the workflow we've built.
Taking the previously created text-to-image workflow as an example, click "Export" in the function area. A pop-up will appear in your browser, allowing you to name the file. After confirming, the browser will download the file with a "json" suffix, effectively packaging our workflow into a file.

- Loading a Workflow
How do we load a workflow? Here are two common methods:
① Click "Open" in the function area, select the saved json file, and click open. The saved text-to-image workflow will appear—simple and straightforward.
② Image Loading. Images generated by ComfyUI contain the workflow used to create them. This means we can load workflows directly from images.
There are two methods for this. The first is similar to the above: click "Open," select the generated image, and the workflow will load.
Another method is to drag the generated image directly into the workspace, which will also load the workflow.
Please note, only images generated by ComfyUI can load workflows. Don't try dragging in a selfie!
The above are two common loading methods. While there are other ways, these two should suffice for most needs.
Conclusion
In this ComfyUI tutorial, we've thoroughly explored the powerful features and flexibility of this node-based image generation tool.
From basic introductions to in-depth operations, we've guided you step-by-step on how to efficiently use ComfyUI, covering everything from installation and model loading to node configuration.
By now, you should have a comprehensive understanding of ComfyUI.